Getting started
TapeDesk is a tape recorder with four to six tracks and a sound engine, for iPhone and iPad. If it's your first time, start here.
What you need
You need an iPhone or iPad with iOS 17 or later. On iPhone the app runs in portrait, and on iPad in any orientation. You can record with the device's own mic or with a USB audio interface. There's no account and no sign-up.
The first time you open the app it loads a sample tape called demo, with four tracks recorded at 120 BPM. You can change it or delete it like any other tape.
The app asks for three permissions: the microphone to record, the local network to find other apps with Link, and Bluetooth to pair a MIDI controller. It doesn't collect any data.
The two modes
Choose recorder or groovebox in settings ▸ app ▸ mode. recorder gives you the tape and the mix. groovebox adds the synth and the track screen, where you play and record at the same time. Switching modes doesn't touch your tapes.
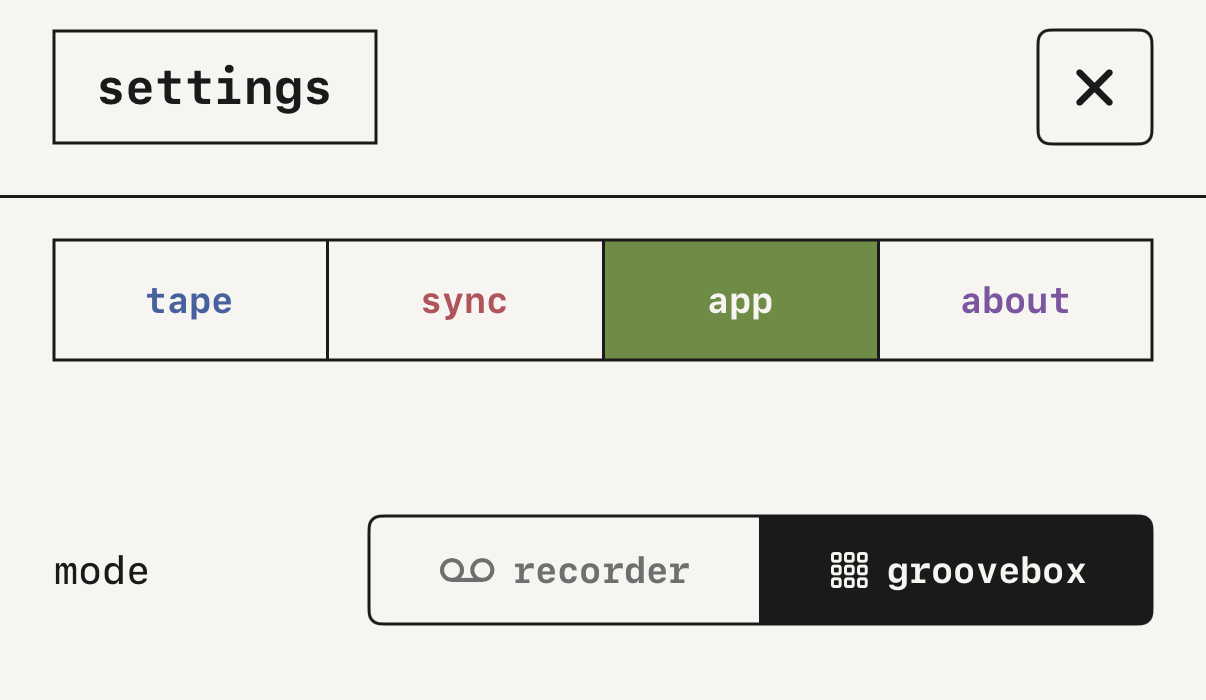
mode row in the app settings.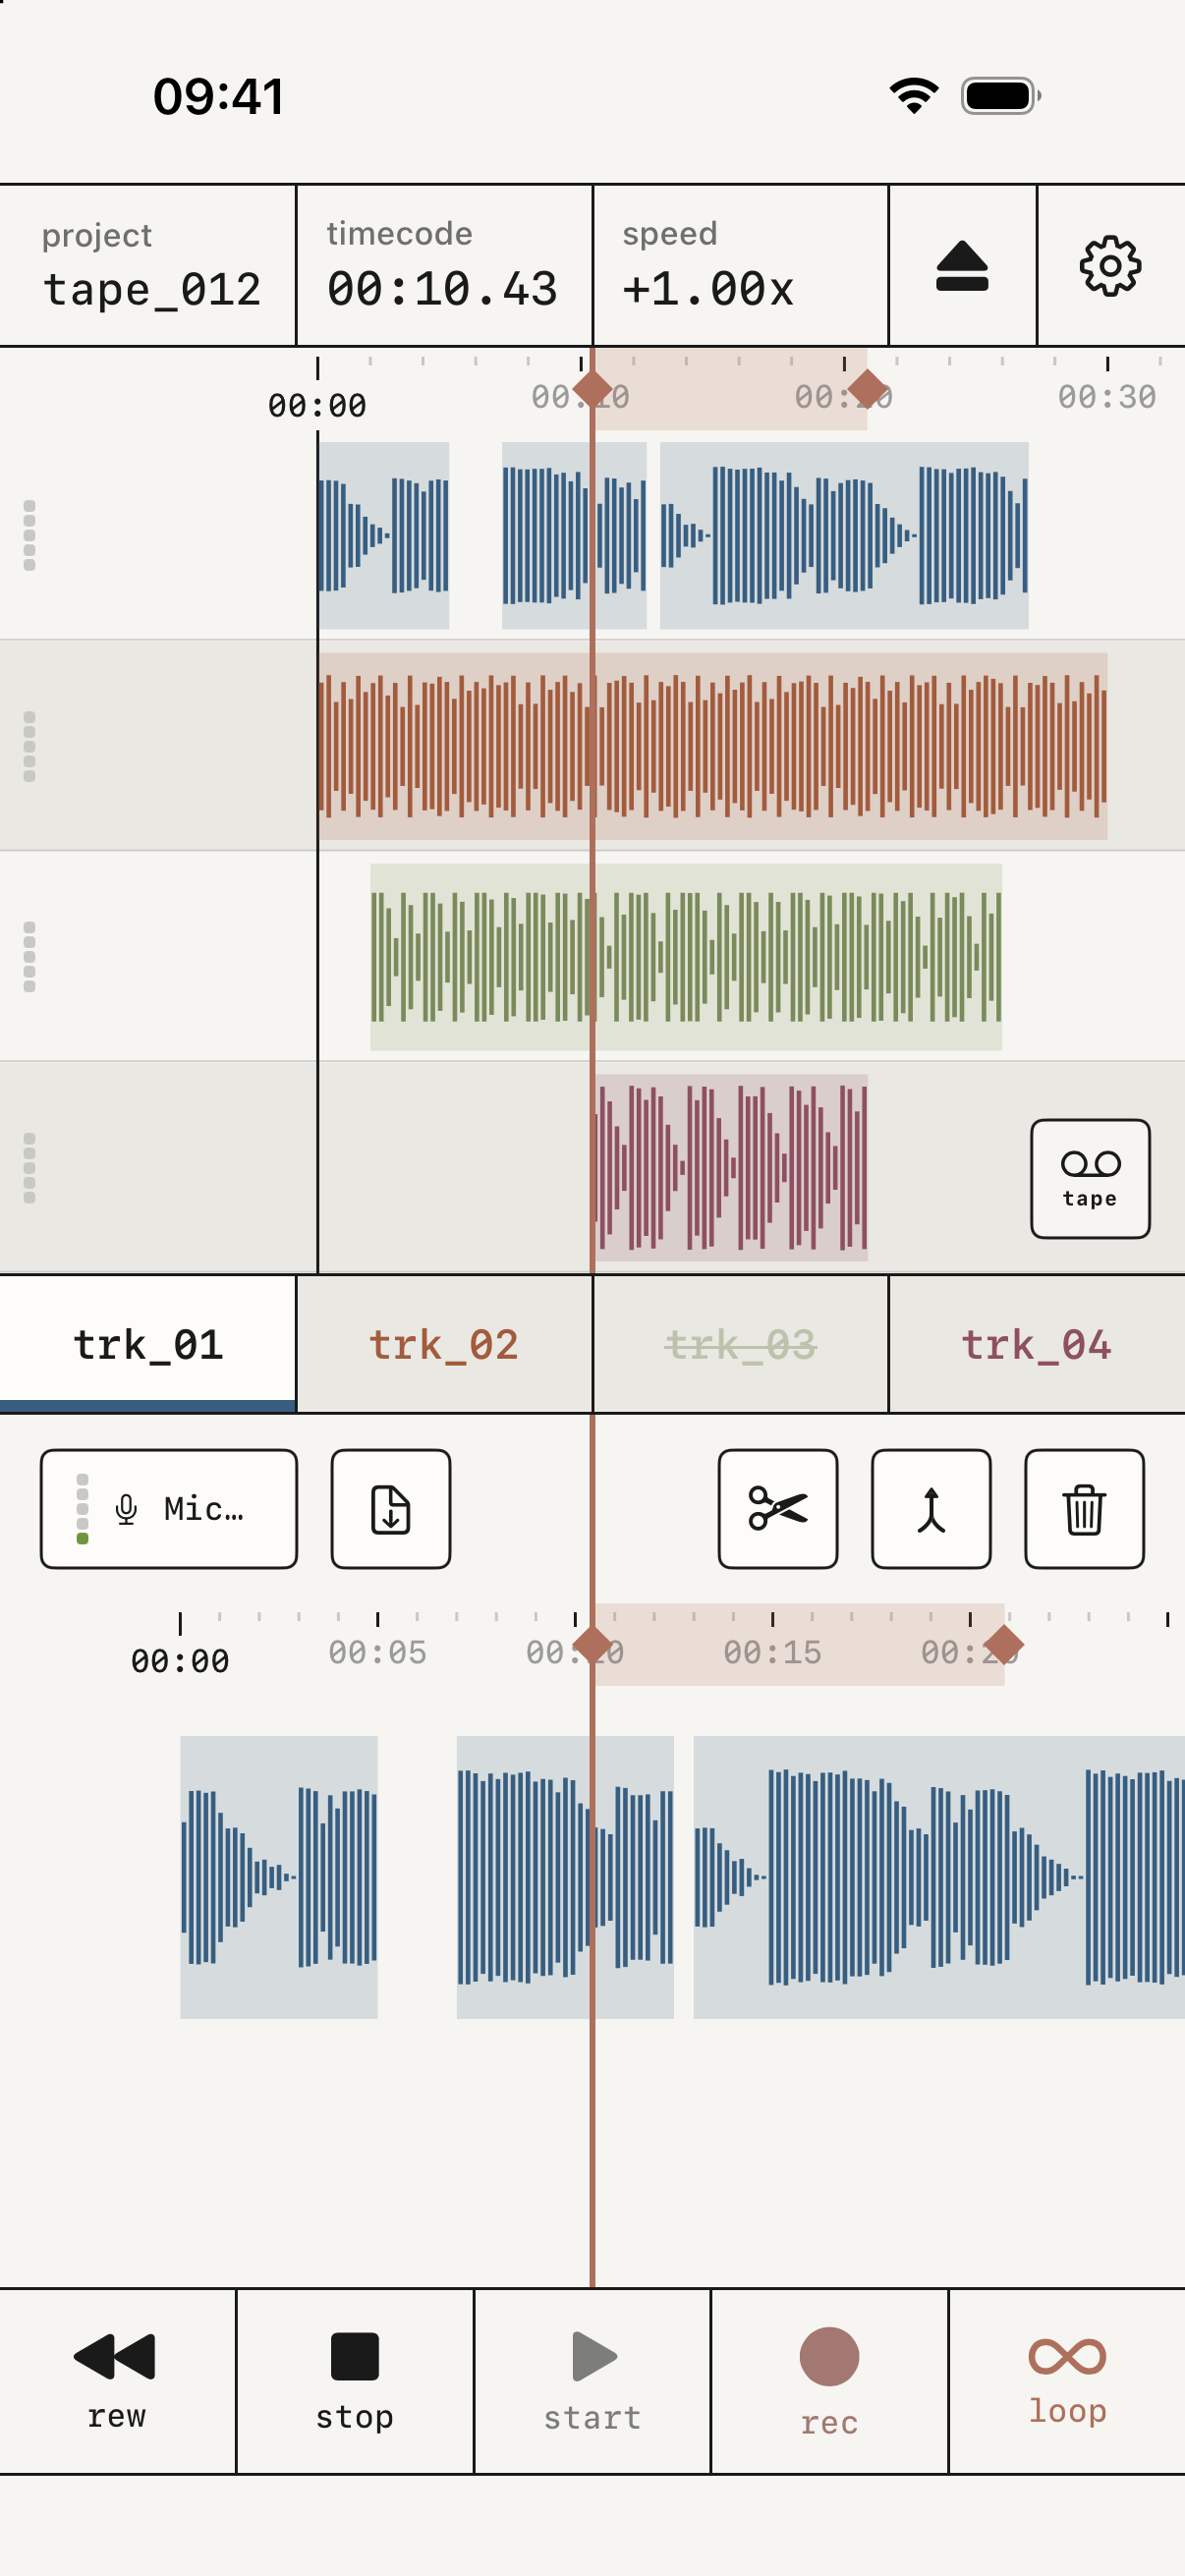
recorder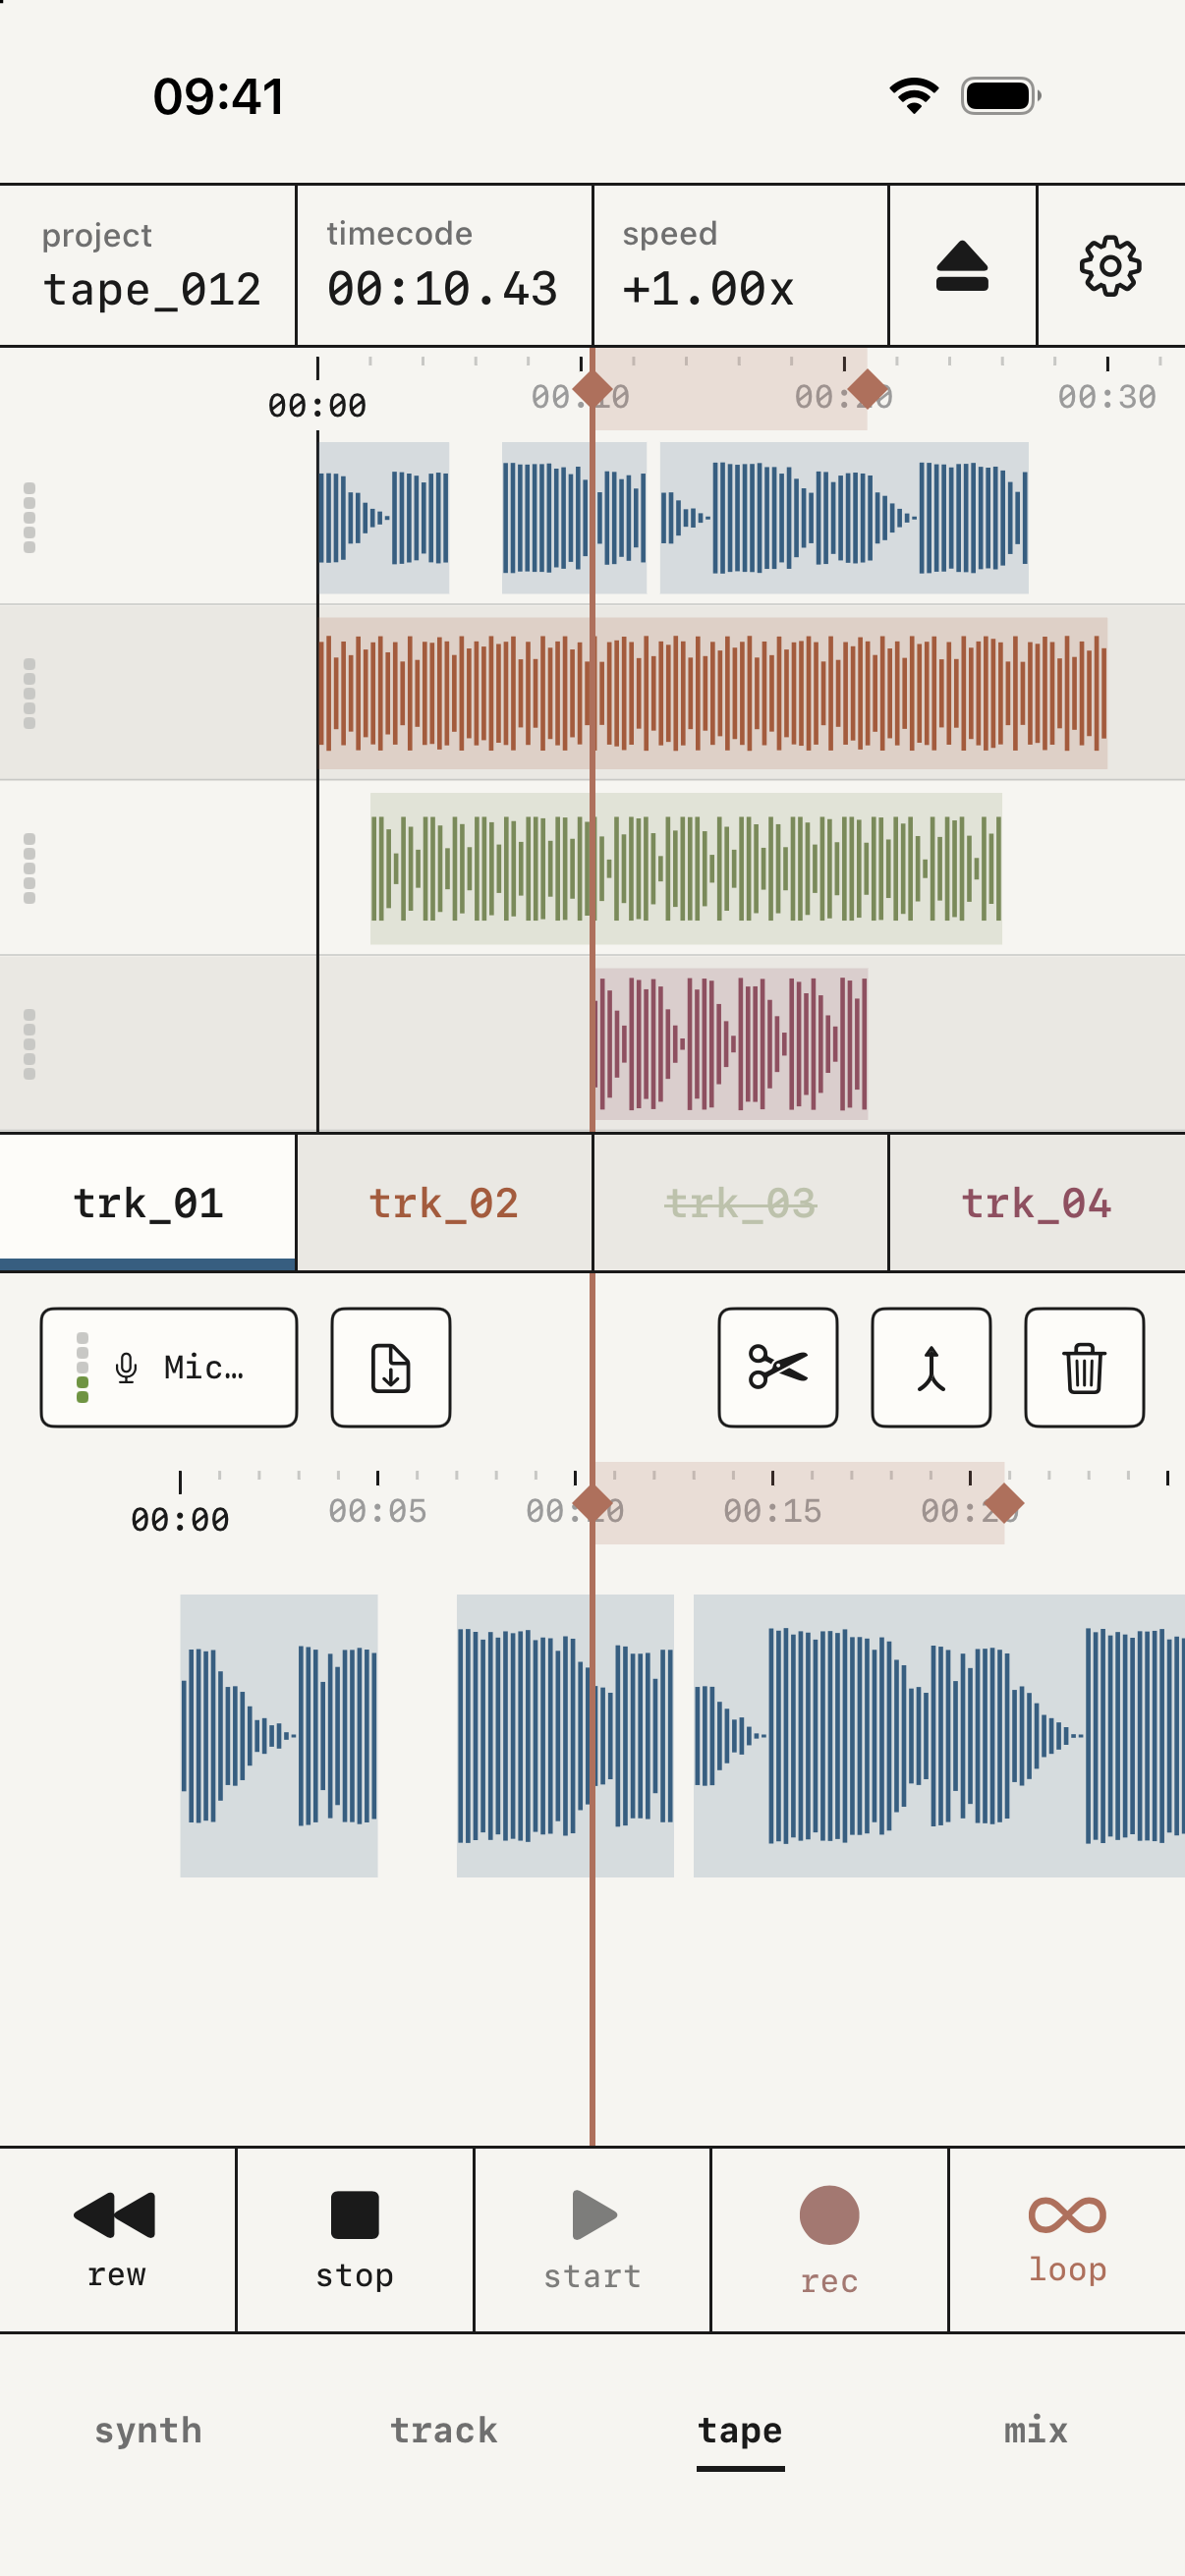
grooveboxThe screen
From top to bottom, the tape screen has the header, the whole tape, the armed track in large, and the transport.
In the header, project opens your tapes, the eject icon opens export and the gear opens settings.
The bottom row takes you to the four places: synth · track · tape · mix.
There's no row of places. The switch in the corner, with the metronome above it, takes you from the tape to the mix and back.

project, timecode and speed.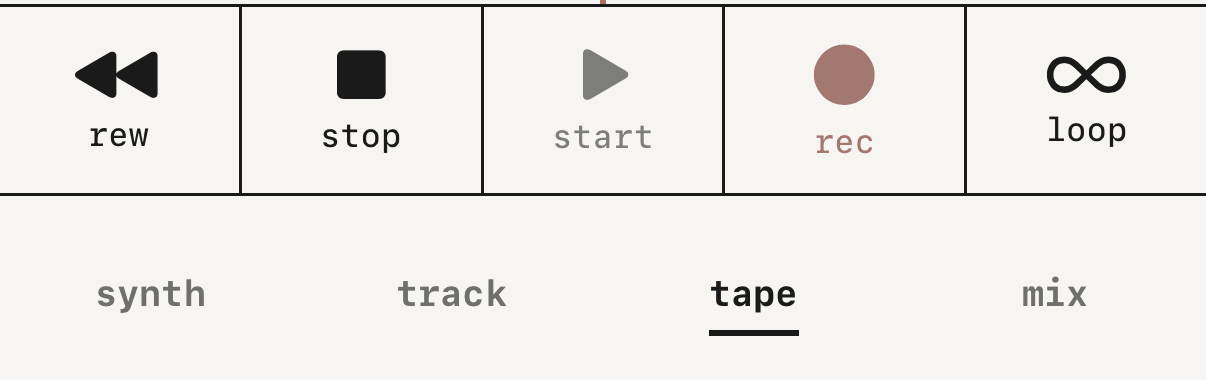
Your first take
- Tap a track's tab to arm it.
- Press
rec. If the tape is stopped, a count-in plays first. - Press
stopwhen you're done. - Press
rewto go back to the start andstartto hear it.
That's a take. The rest you'll pick up as you need it.
Recording
Arm and record
Tap a track's tab to arm it. Each track has its own color, and only the armed one records, unless sources is on.
Press rec to record and stop to stop. With the tape stopped, a count-in in your time signature plays first. You can turn it off with count in in settings ▸ tape.
Recording over a take adds the two together, and both play. That's sos, the default. To replace that stretch instead, set rec mode to punch in the same settings.
If a note gets stuck, tap stop twice: the first tap stops the tape and the second cuts anything still sounding.
sos layers the two takes and punch replaces the stretch.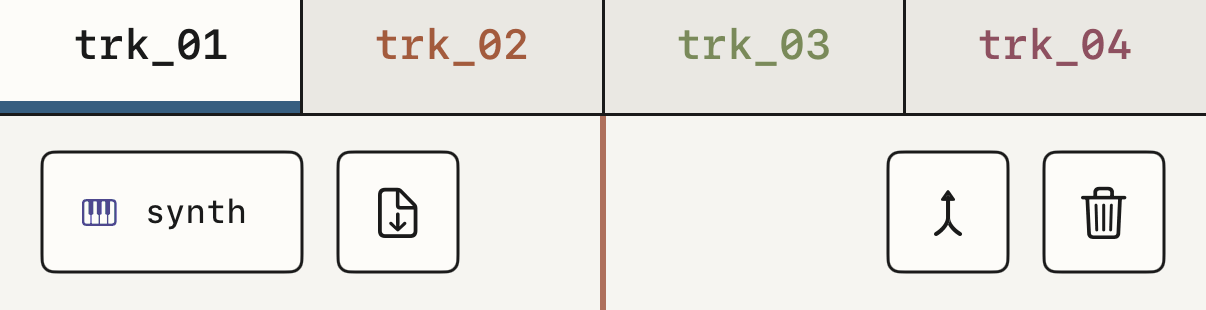
Let the take start itself
Hold rec and a threshold fader appears, from −60 to 0 dB. The take starts on its own when the input crosses it, which helps when you're recording alone and the phone is out of reach.
rec, one clap, and the take starts itself.Tracks
A tape has four to six tracks. It starts with four on iPhone and six on iPad, and you change it with tracks in settings ▸ tape. Each track holds 128 regions, and a tape holds 10 minutes.
If lowering the number would remove a track with takes on it, tap the same number twice to confirm. undo then appears under tracks and brings the whole track back.
Live looper
With a loop active, rec records over what's playing without erasing it, one layer per pass. When you press stop, all the layers become a single loop.
The threshold works here too. Hold rec, leave the fader where you want it, and the layer starts on the first hit. What you played just before crossing the threshold is kept.
With sources on, each pass records every track in the grid. See recording several inputs at once.
Recording several inputs at once
Each track can record its own source in the same pass. A source is the synth, the phone's mic or any channel of a USB audio interface, so even without an interface you have two: the synth on one track and your voice on another.
Tap the input button to open the monitor panel, and press sources in the source row. The source → track grid opens. Tap a track, then tap the sources it should record. When you press rec, every track with a source records at once, and on stop each one keeps its own region. It works the same with the loop and with the threshold.
- One interface channel can go to several tracks, and one track can take several channels.
- The synth goes on one track only. If you put it on another, it moves.
- A track records the synth or the input, never both.
- Tap an armed tab again to put that track in
safe. It still shows its source, but it doesn't record on the next pass. - Interface channels come in at unity gain, so set their level on the interface.
- To record the synth and your voice together, listen on wired headphones. See where the audio comes in.
The grid is saved with the tape and comes back when you open it with the same input connected. To record a single source again, tap synth or input in the same row.
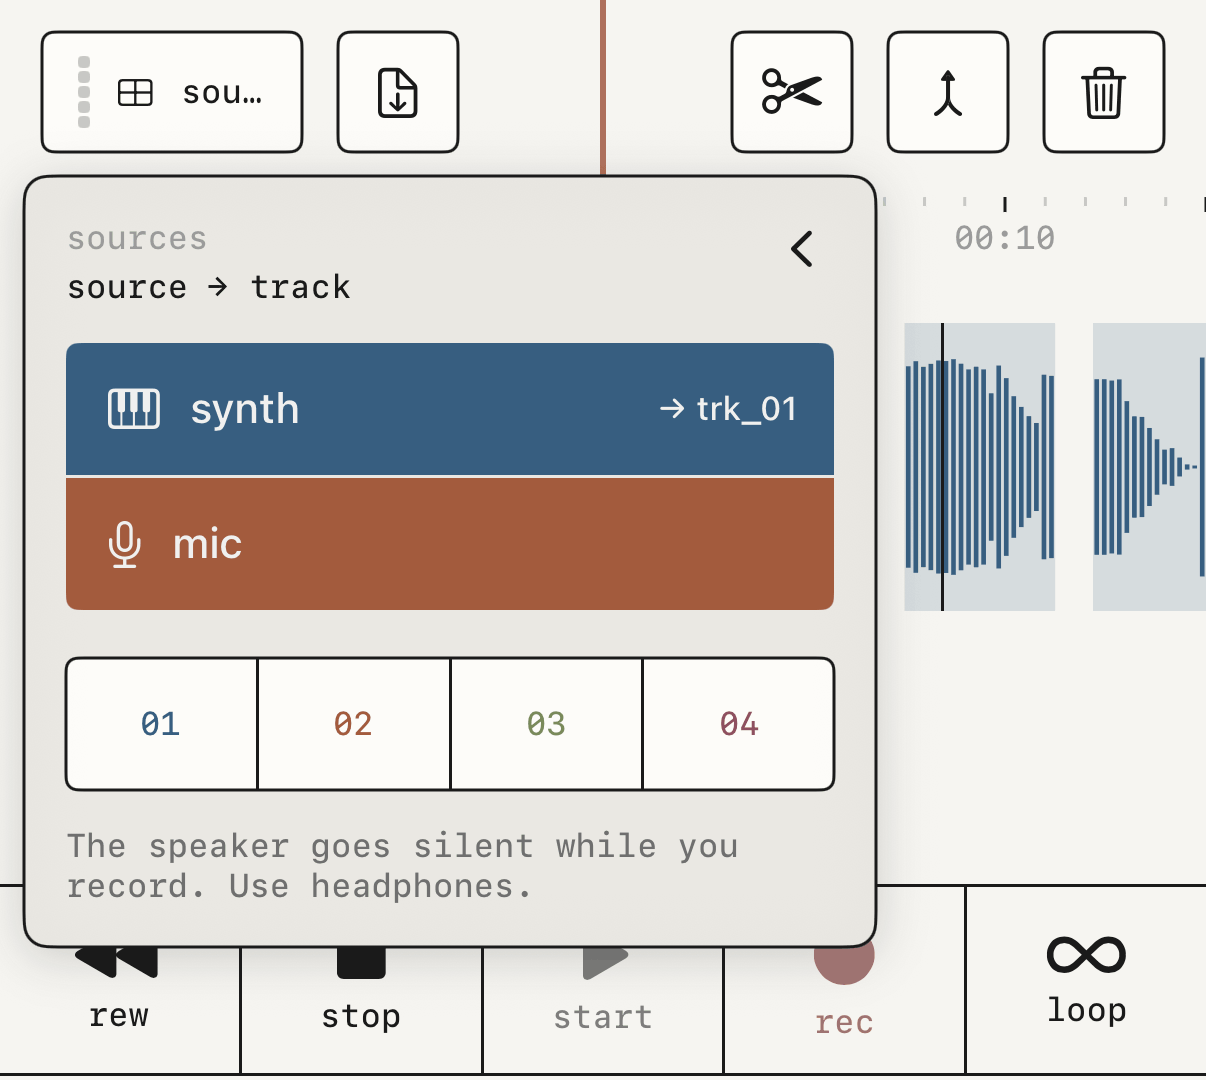
trk_01 and the mic on trk_02.Recording the synth groovebox
The track screen is where you play and record the synth: the track tabs at the top, the keyboard at the bottom and the armed track's take in the middle.
What rec records depends on the screen: the synth in synth and track, the input in tape and mix. You can change it from any screen with synth or input in the source row of the monitor panel, for example to record the synth from the tape while you play a MIDI keyboard. The input button always shows what rec will record: the word synth, or the device's name and its meter.
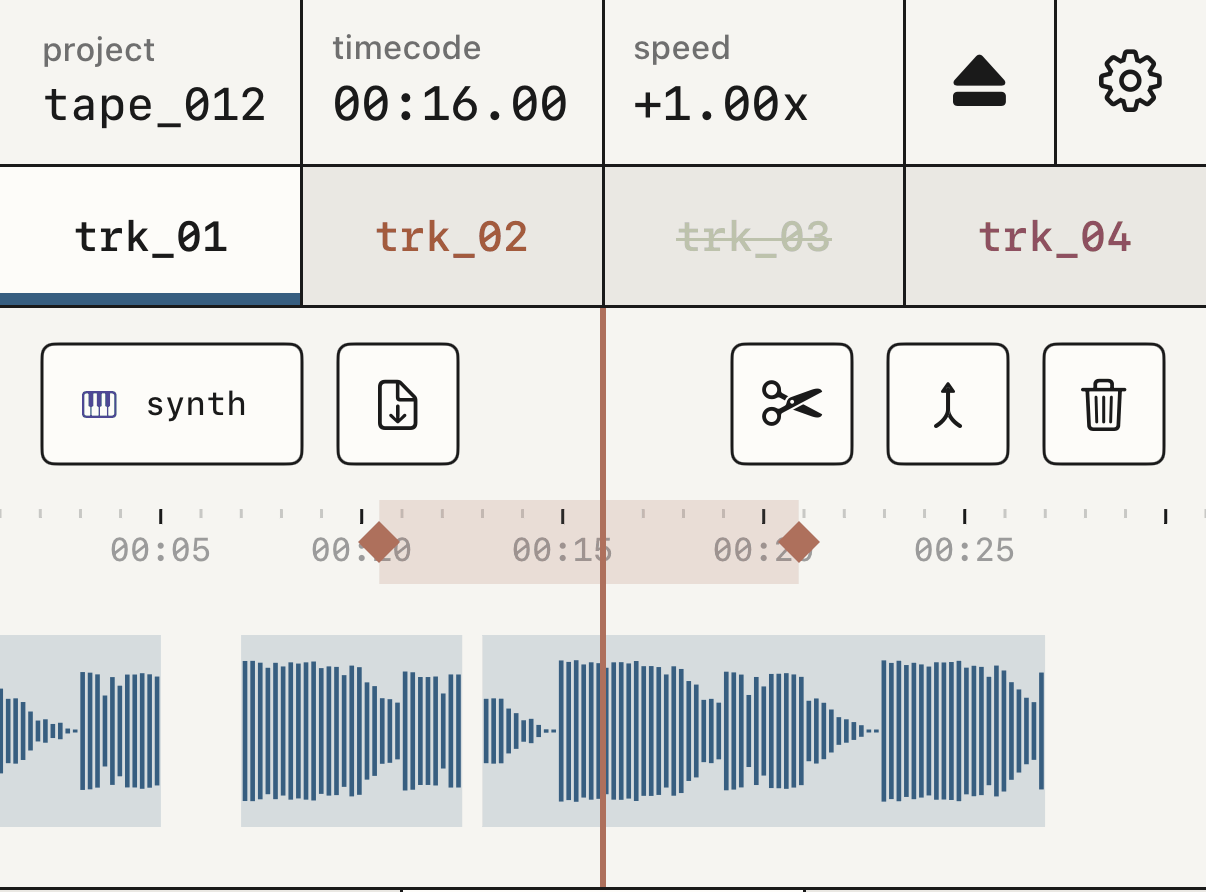
track screen, with the armed tab and the take in large.source row from input to synth.Where the audio comes in
iOS picks the input: the device's mic until you connect an interface, and the interface from then on.
Over Bluetooth, what you hear arrives about 200 ms late, and a take recorded against it can't be lined up. Listen on wired headphones while you record.
If you record with the phone's mic and listen on the speaker, the output goes quiet while you record, so the mic doesn't pick up what's playing. With headphones you hear everything.
If the app closes in the middle of a take, it offers to recover it the next time you open it. A call or Siri stops the engine, and the take is saved up to that point.
Speed and loop
Speed
Tap speed in the header to open a vertical fader, with 1.00x in the middle, 2.00x at the top and 0.25x at the bottom. The pitch follows the speed, as on a tape deck.
The padlock under the fader decides what happens when you let go. Open, the speed returns to 1x. Closed, it stays where you left it and is saved with the tape.
A take recorded at another speed keeps that speed when it plays back.
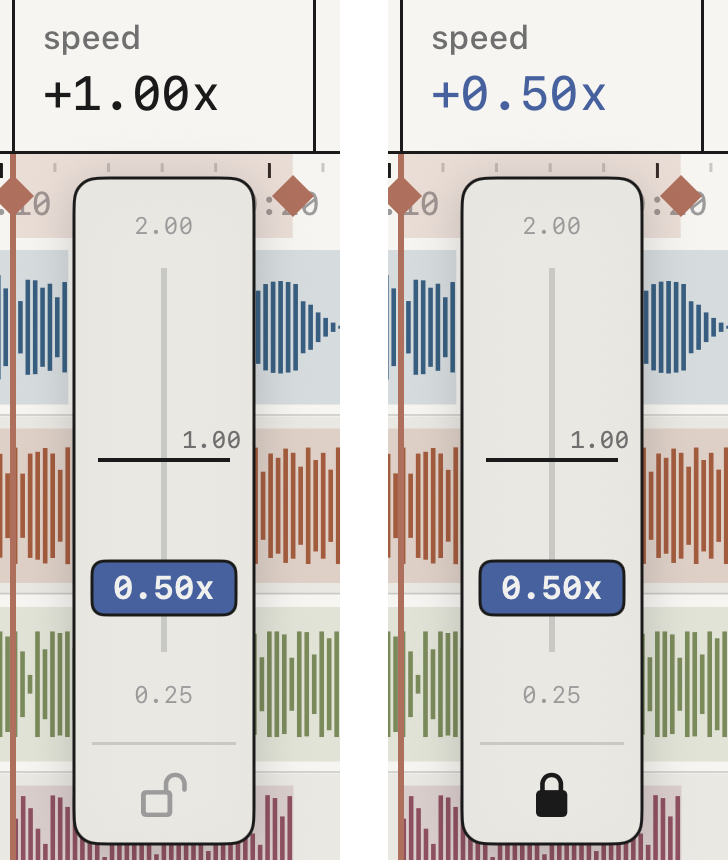
Moving around the tape
rew goes back to the start. While you hold start, rew fast-forwards.
Drag the armed track to move the playhead. With the tape stopped it follows your finger like a record, and with the tape playing the drag speed bends the pitch.
While you drag, each mark on the ruler gives a soft tap, and numbered bars, the edges of regions on the armed track and the ends of the loop give a firmer one.
Loop
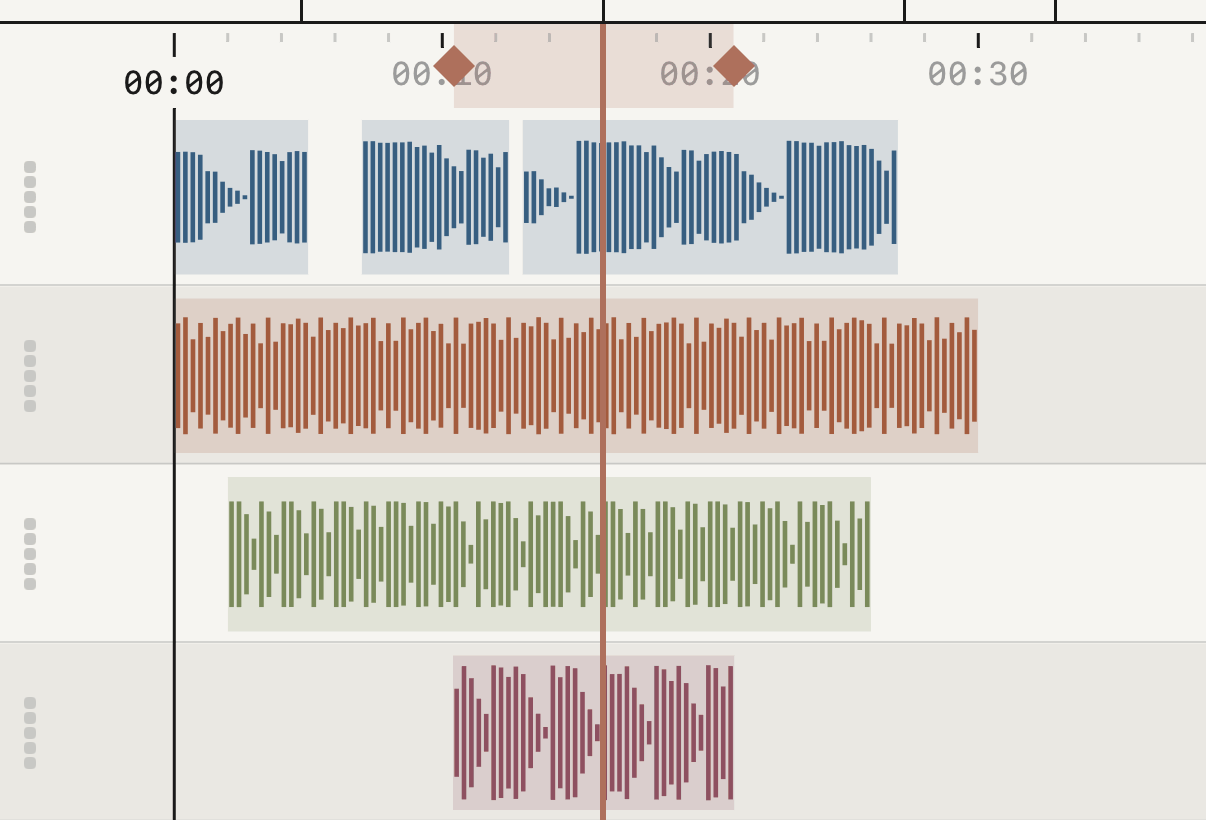
Drag the handles on the ruler to set where the loop starts and ends, up to the whole tape. The join has a short fade.
With a region selected, loop in the edit bar fits the loop to that region.
Editing
Every recorded take is a region.
The edit bar
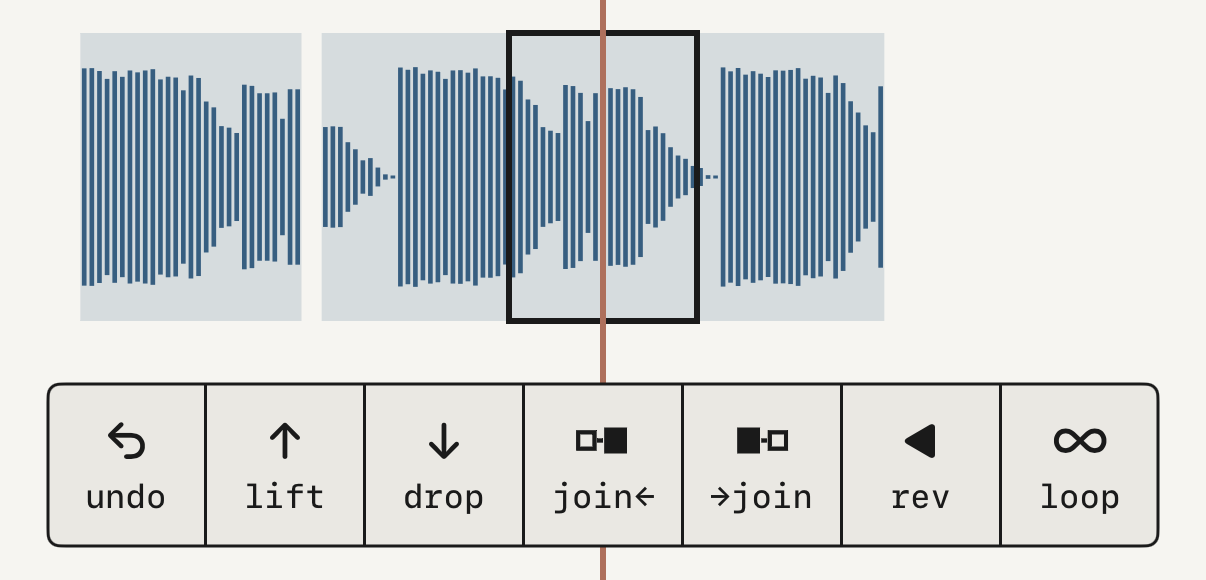
Tap a region to select it and the edit bar appears, with only the keys that apply at that moment.
lifttakes the region off the tape and holds on to it.dropputs it at the playhead, on the armed track. Drop it again to leave copies.join←and→joinjoin it to the region on the left or on the right.revreverses it, and a small◁shows that it plays backwards.loopfits the loop to the region.undoandredowork track by track.
Track tools
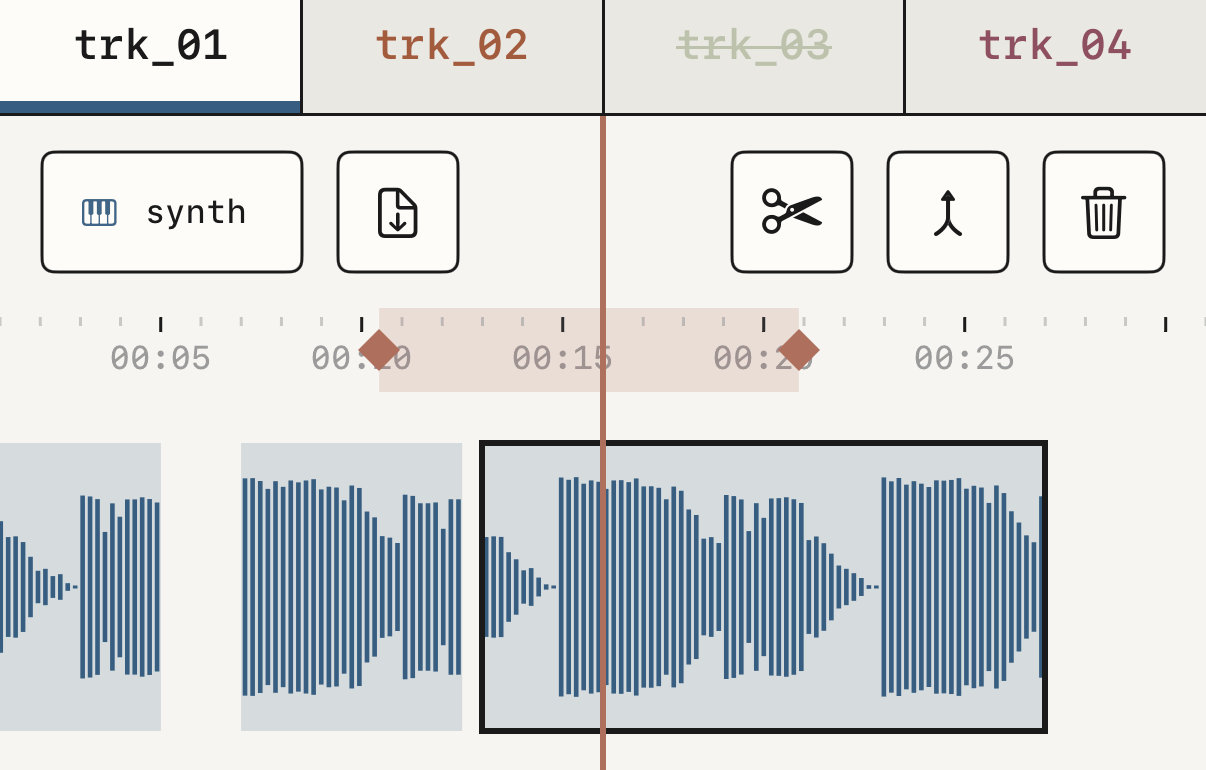
The row under the track tabs has four tools.
- The input button opens the monitor panel.
- The document icon imports an audio file onto the track.
- The scissors cut the region at the playhead.
- The bin empties the armed track, and
undobrings it back.
Bouncing two tracks into one
bounce merges two tracks into one to free a track. With print, the default, the source track's fader, pan and both sends are written into the audio, and those controls go back to neutral so they aren't applied twice.
Synth groovebox
The synth has eleven synthesis engines, a sampler and a drum kit. You play it with keys, chords or seq.
Picking a sound
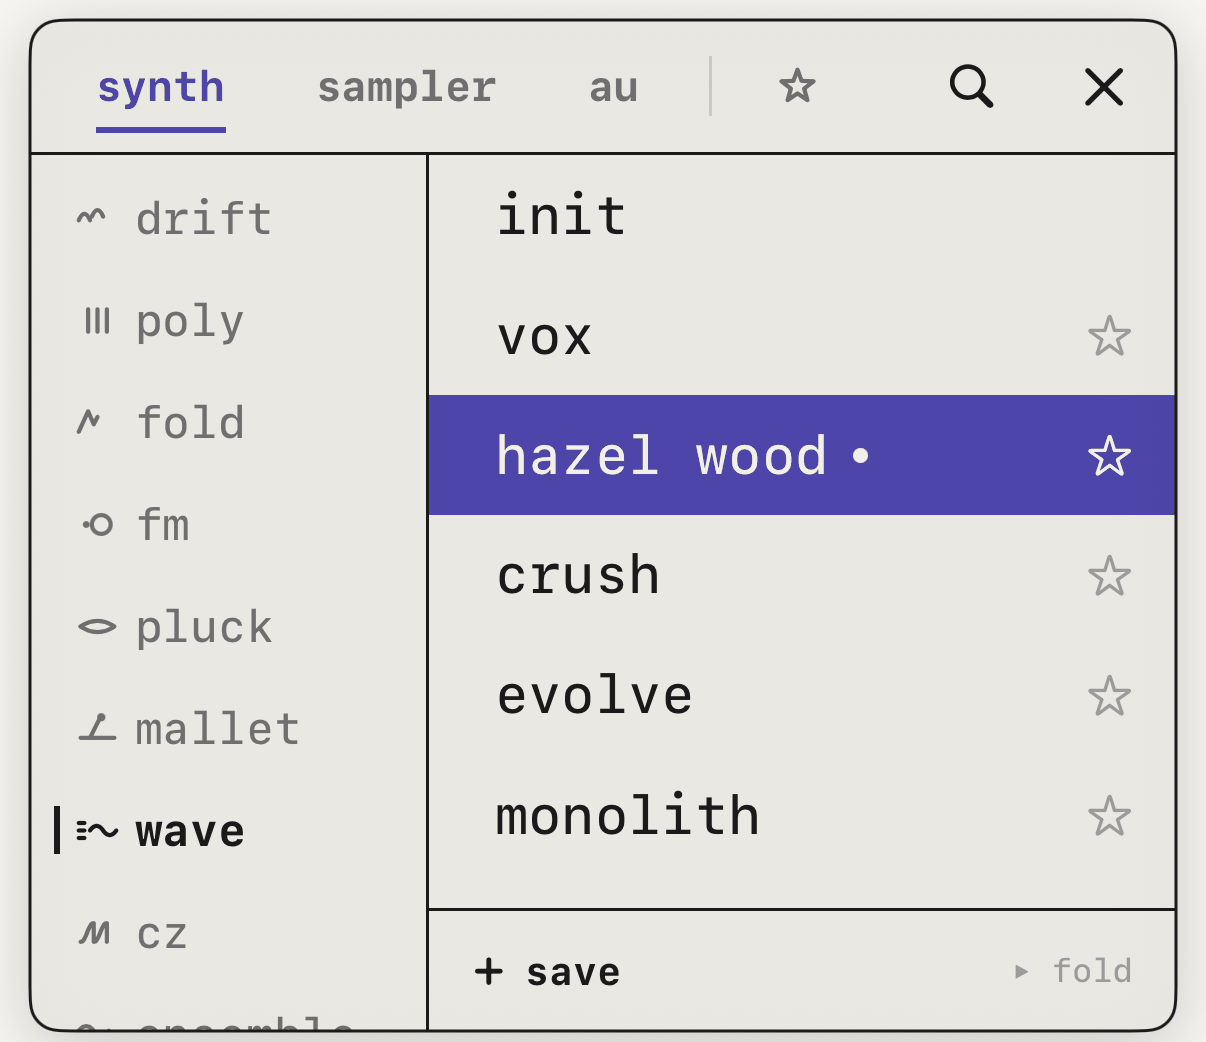
Tap the cell at the top that shows the engine and the preset to open the browser, with the engines on the left and their presets on the right. At the top are the three families, synth · sampler · au, and the by sound star, which groups sounds by instrument and keeps your favorites and folders.
Tap a preset and it loads right away, and the browser stays open. A double tap loads it and closes. If you would lose sampled sounds you haven't saved, it asks first.
save stores the current sound as a new preset. Hold one of your presets to rename, cut or del it. The star marks it as a favorite. A dot next to the name means you've changed the sound and haven't saved it.
Each track's sound
If you can't remember which preset you recorded a track with, the tape knows. Each time you record the synth onto a track, the tape keeps the sound that was playing.
It's in by sound, in a folder named after the tape, with one row per track. Recording onto that track again replaces it.
These sounds belong to the tape: other tapes don't show them, and they're deleted with it. To keep one, load it and save it as a preset.
Shaping the sound
Under the sound's name there are five tabs, each with two rows of knobs.
synthhas the engine's four macros on top, andvoice(poly·mono·legato),glideandlevelbelow.adsrdraws two envelopes, one for volume and one for the filter.filterholds cutoff and resonance in a single curve, the filter type and how much the envelope moves it.lfohas two LFOs. Tapdest, then the knob you want it to move. Holddestto remove it.fxis the engine's own effect, separate from the ones in the mix.
Every knob is listed in the engine cards and the fx insert cards.
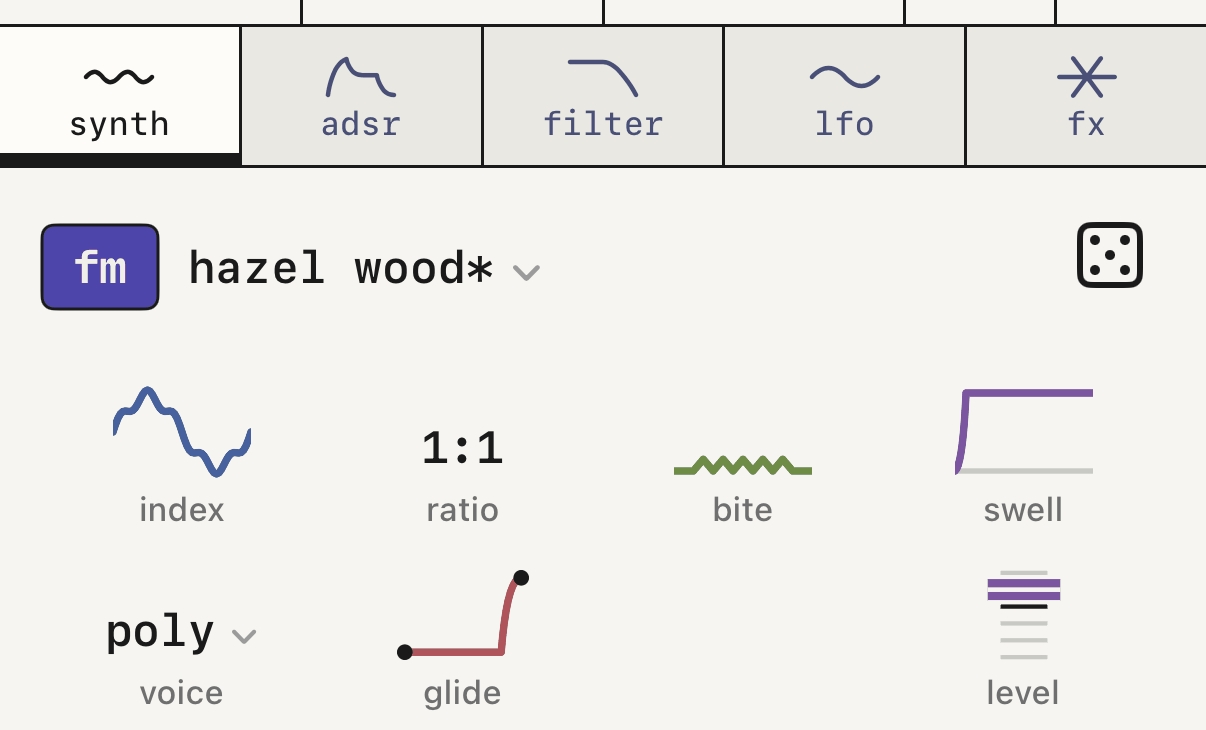
synth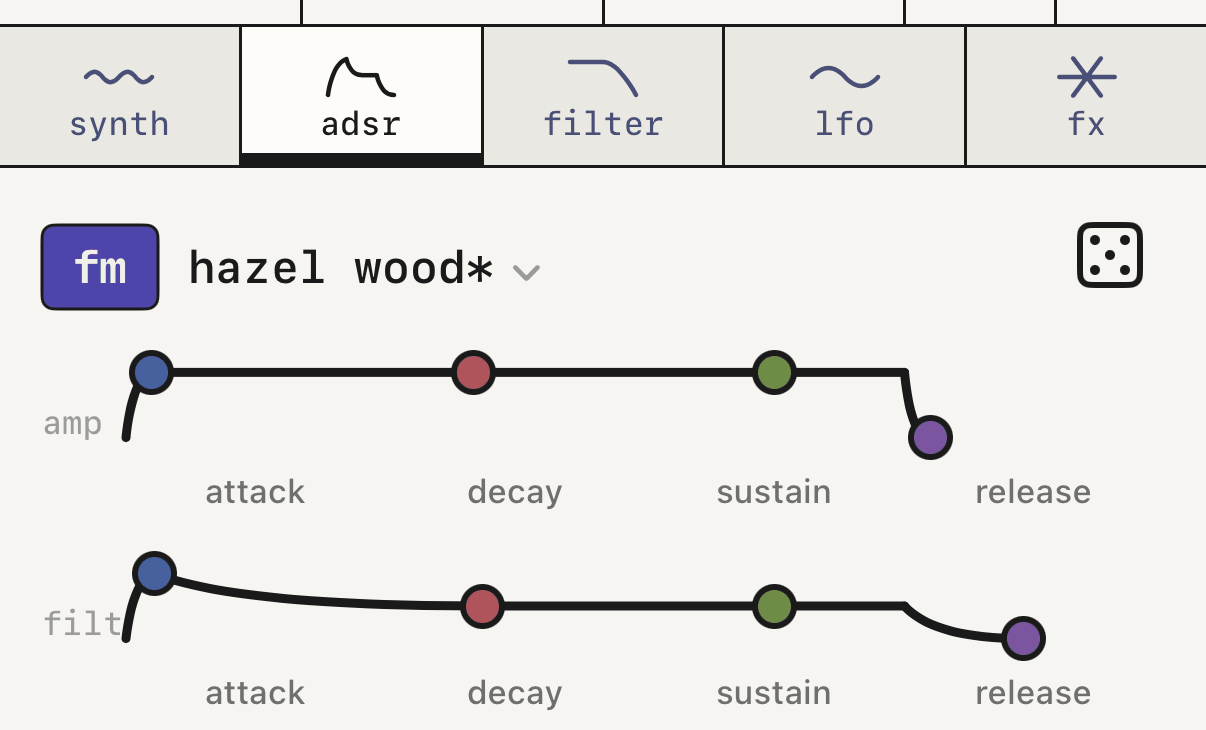
adsr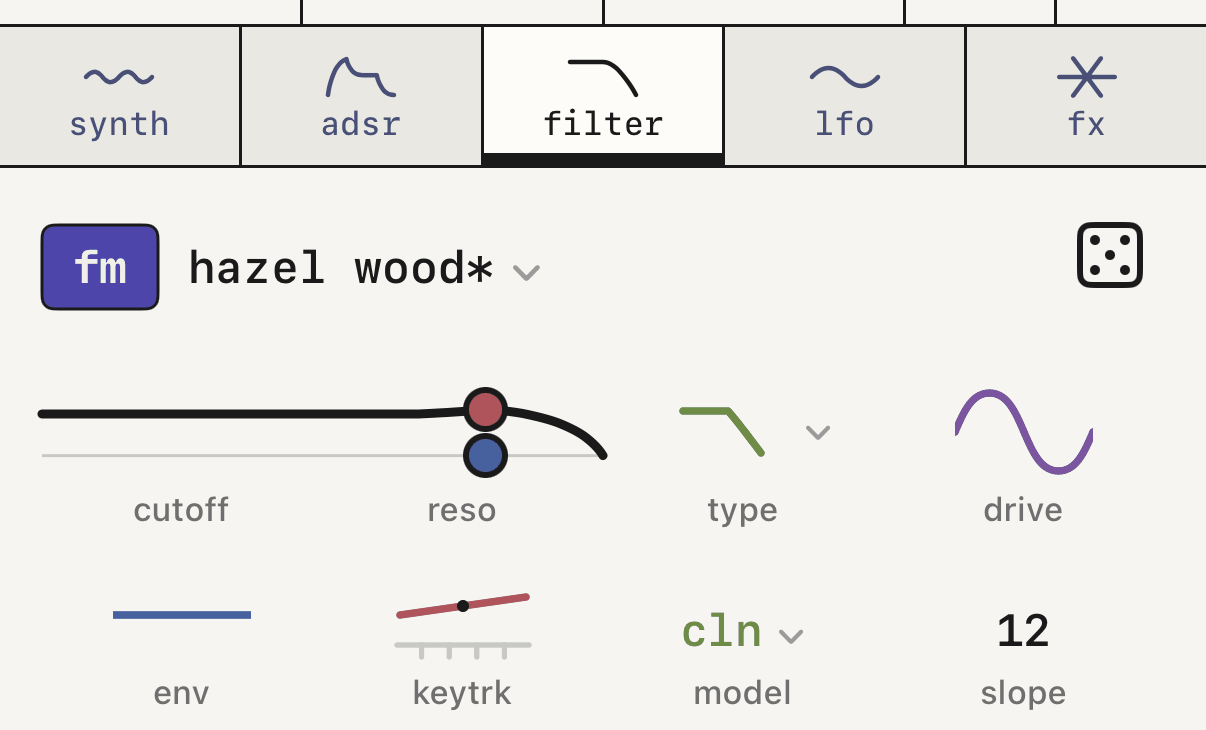
filter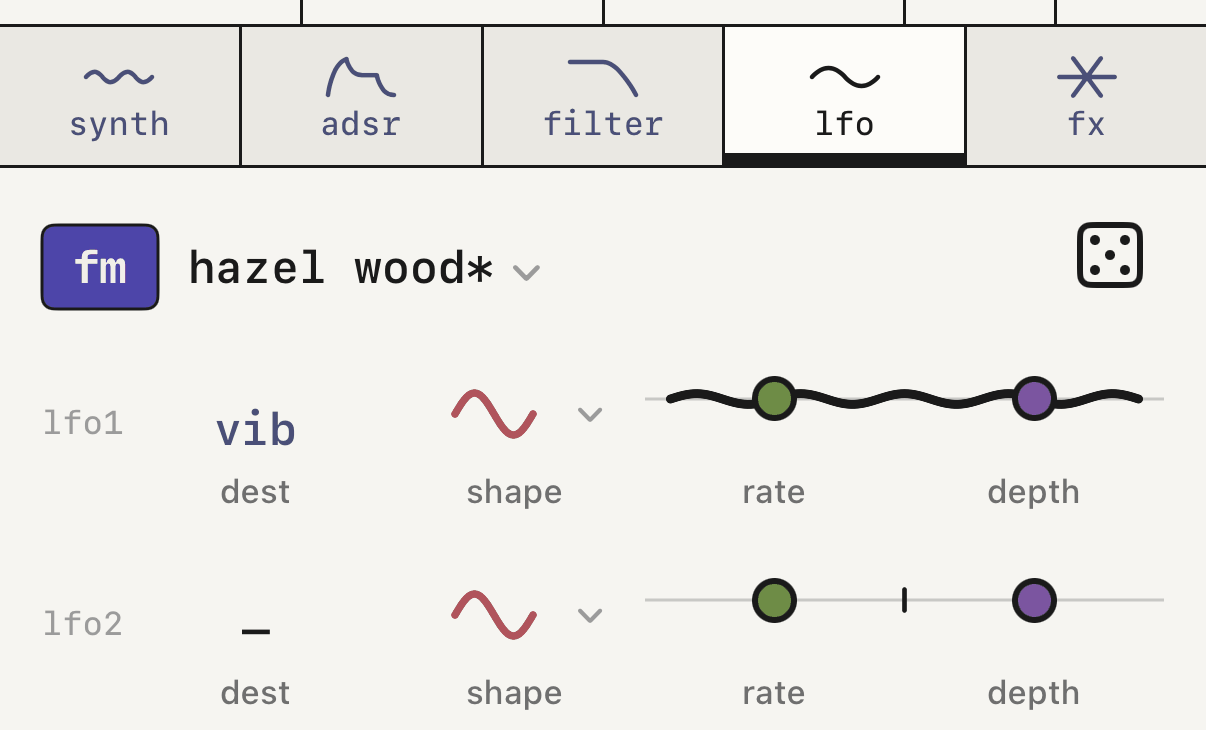
lfoKeys
The keyboard only plays the notes of the active scale, which you pick with root and scale right above it. There are 14 factory scales, and you can make your own from the scales menu. − and + change the octave.
How hard a note plays comes from how firmly you press and from the hit the phone picks up, or from the pressure with Apple Pencil. To make every note play the same, set velocity to 0 in the app settings.
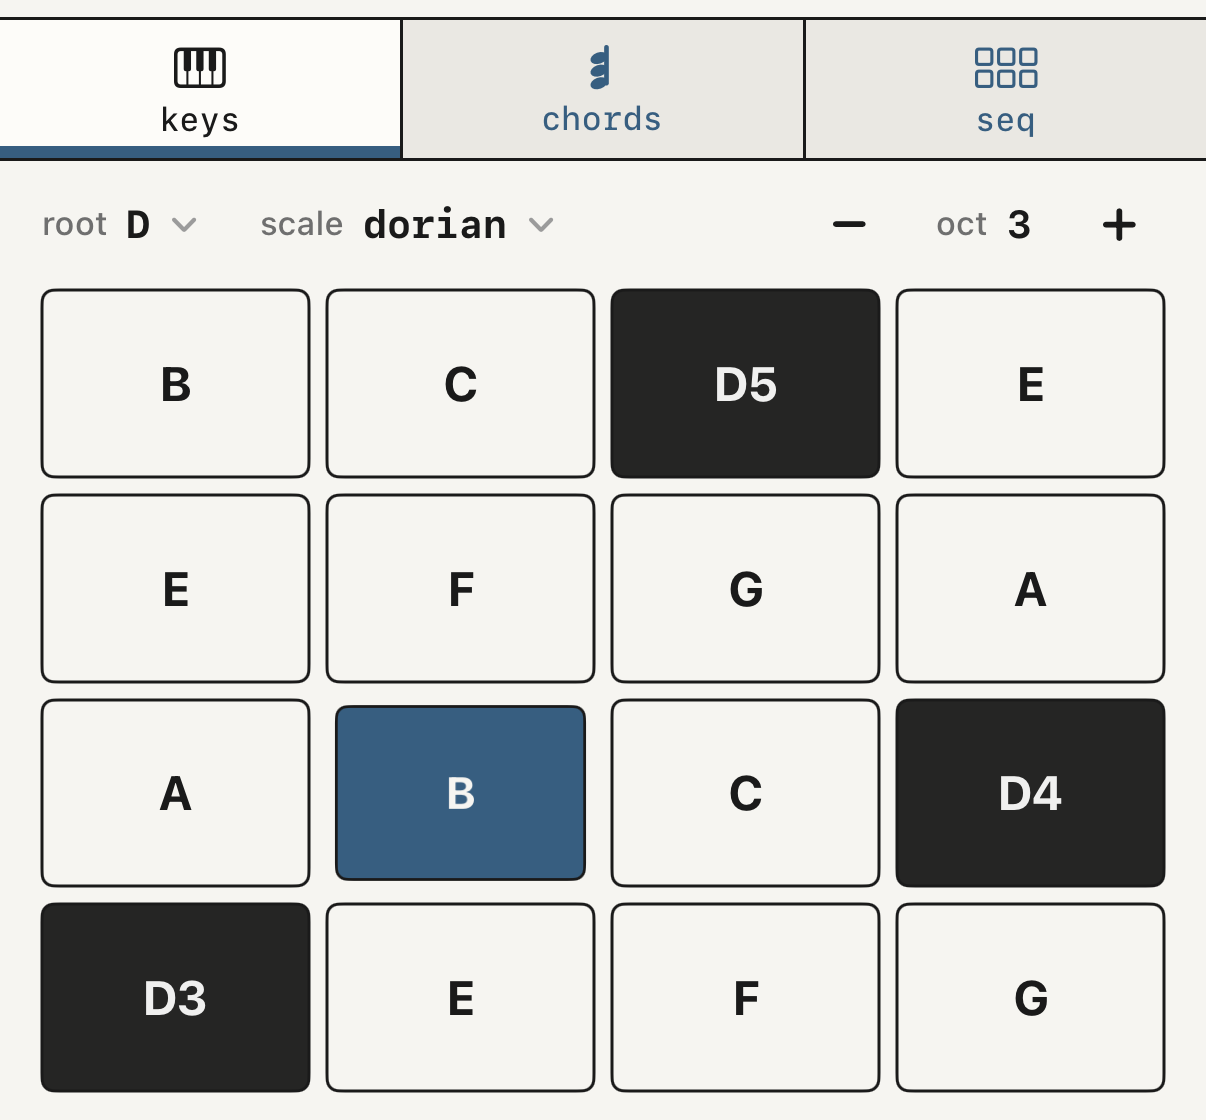
keys, with the root, the scale and the keyboard.Chords
chords puts a chord on each pad, in two modes.
In scale there are eight pads, one for each degree of the scale. Hold a modifier such as 7, 9 or sus and the pad you tap changes chord. Tap a modifier and let go without touching a pad, and it stays on until you tap it again.
The chords play close, with the notes together in the middle of the keyboard and no bass. Move them lower or higher with − and +.
In custom you build your own chords on two banks of eight pads. Tap edit or an empty pad. Each note you play on the keyboard is added to the chord, up to eight. Then press save.
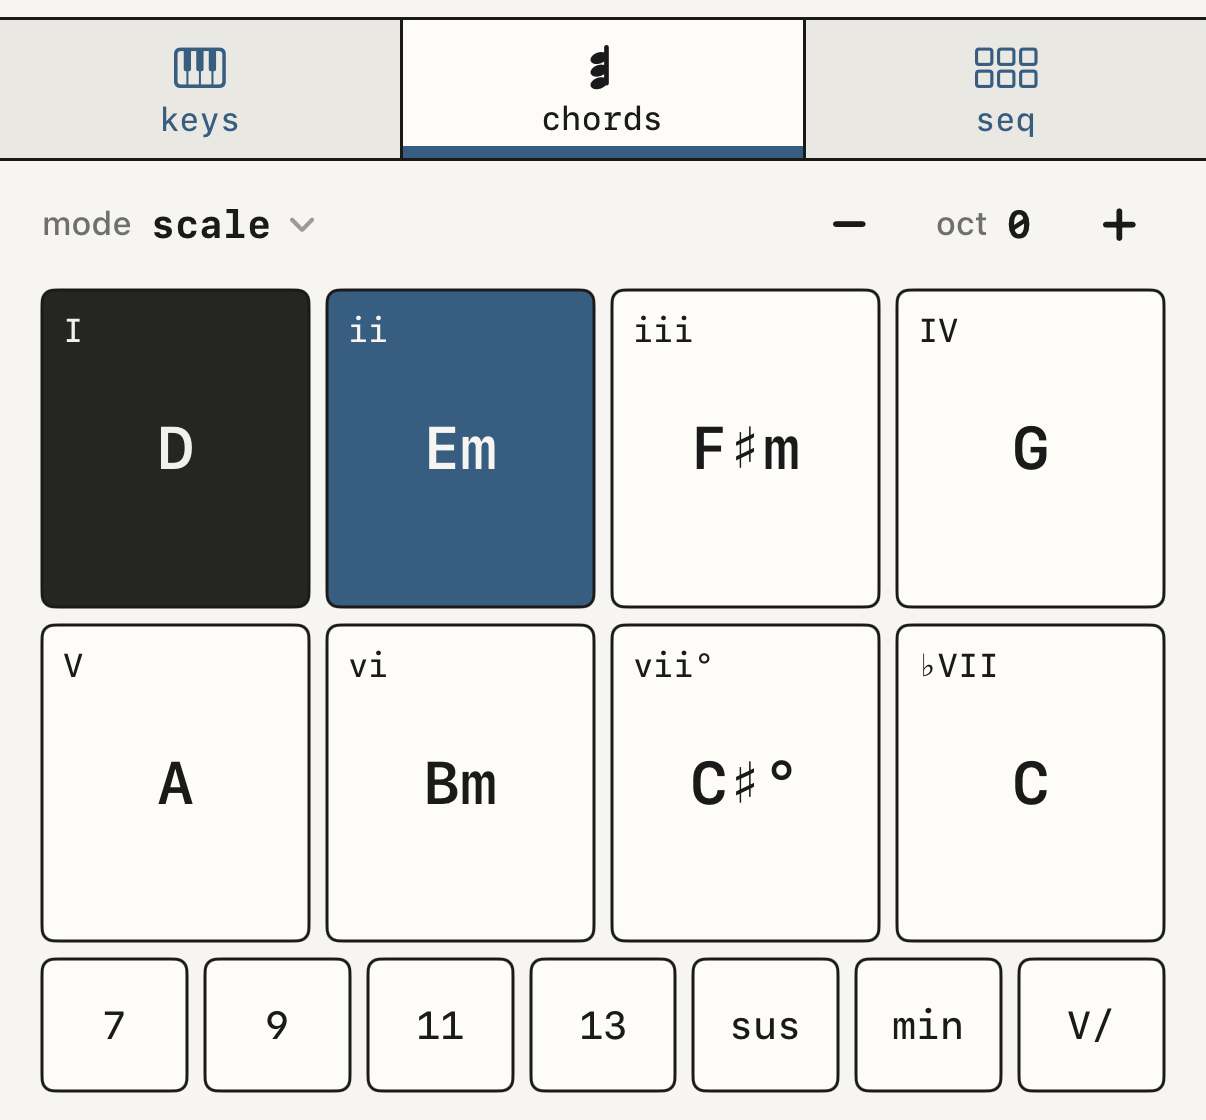
chords in scale, with the row of modifiers.Seq
seq has five positions, which you choose with the name at the top left: off · arp · step · ping · eucalyptus.
arparpeggiates what you hold inkeysorchords, on a ring of 16 steps.stepis a sequencer of up to 64 steps, in pages of 16. Tap a step to go to it and write. A double tap clears it.pingis a pool table with bells. A tap places a bell and a drag shoots a ball. Every bell a ball crosses rings. Careful, it's addictive.eucalyptushas its own section, right below.
With off, whatever you had stays saved for when you come back.
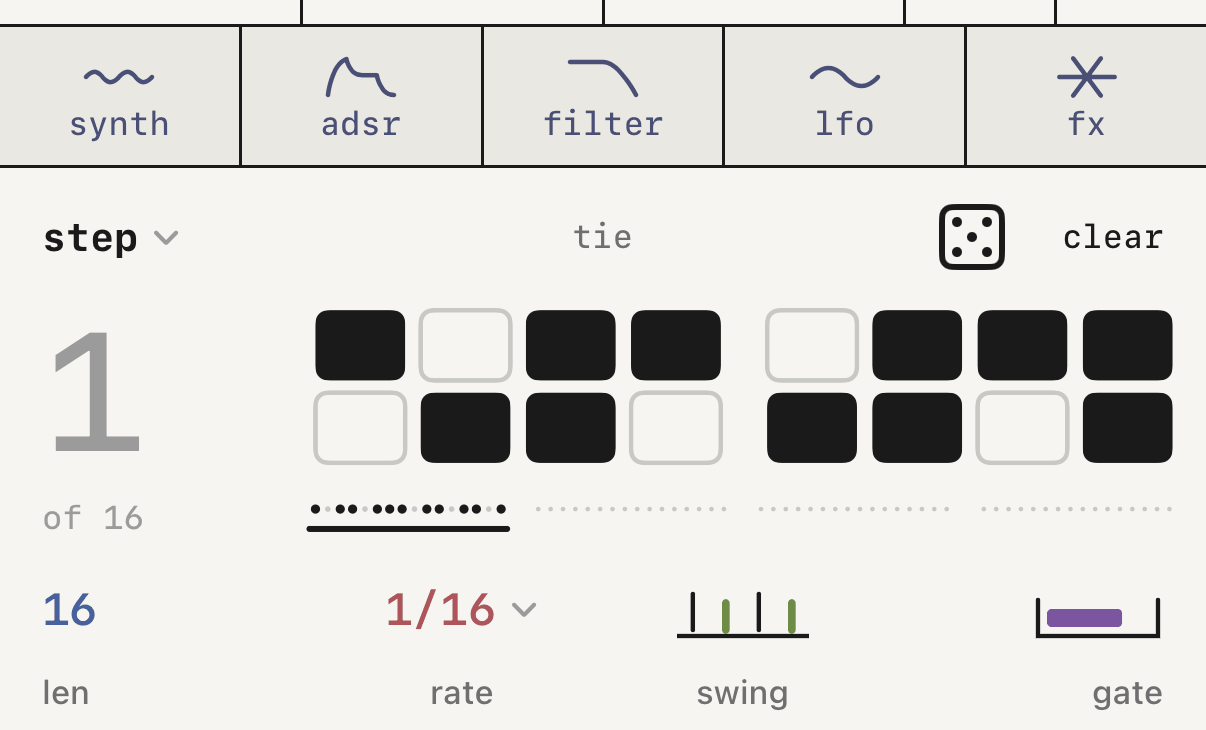
step with a few steps written.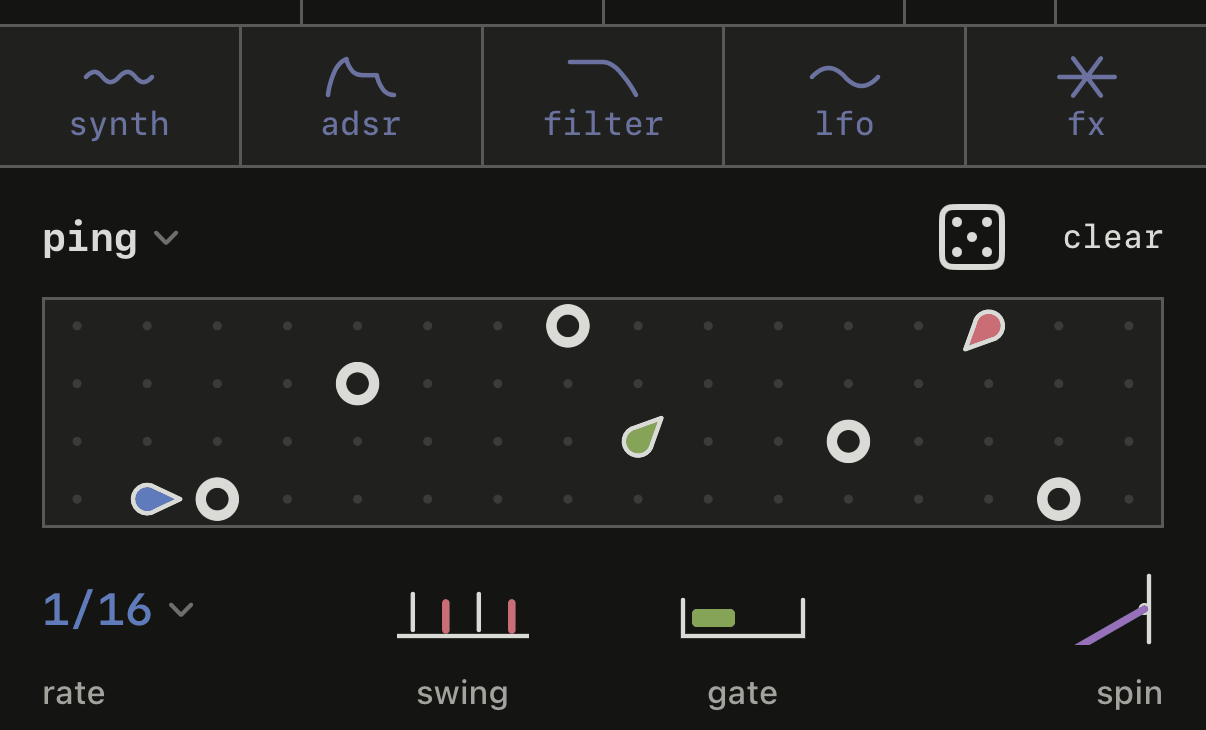
ping with the balls bouncing between bells.Eucalyptus
eucalyptus is a looping piano roll, inspired by the sequencer in Koala Sampler. You fill it by playing or drawing notes, and when you like it you print it to the tape.
Under the roll there are four keys.
runstarts it.recwrites what you play inkeys,chordsorkitinto the roll, adding more on each pass.lensets how many bars it lasts, in the tape's time signature.printrecords it onto the tape.
Tap the roll to open it in large. loop, snap and quant are at the top, and pen, vel, prob and undo at the bottom. pen draws notes, and vel and prob set each note's strength and probability. Pinch to zoom, and [] shows the whole roll again.
print records exactly one pass onto the armed track, starting at the bar line closest to the playhead. The tape has to be stopped. Print twice in a row and the second pass lands right after the first.
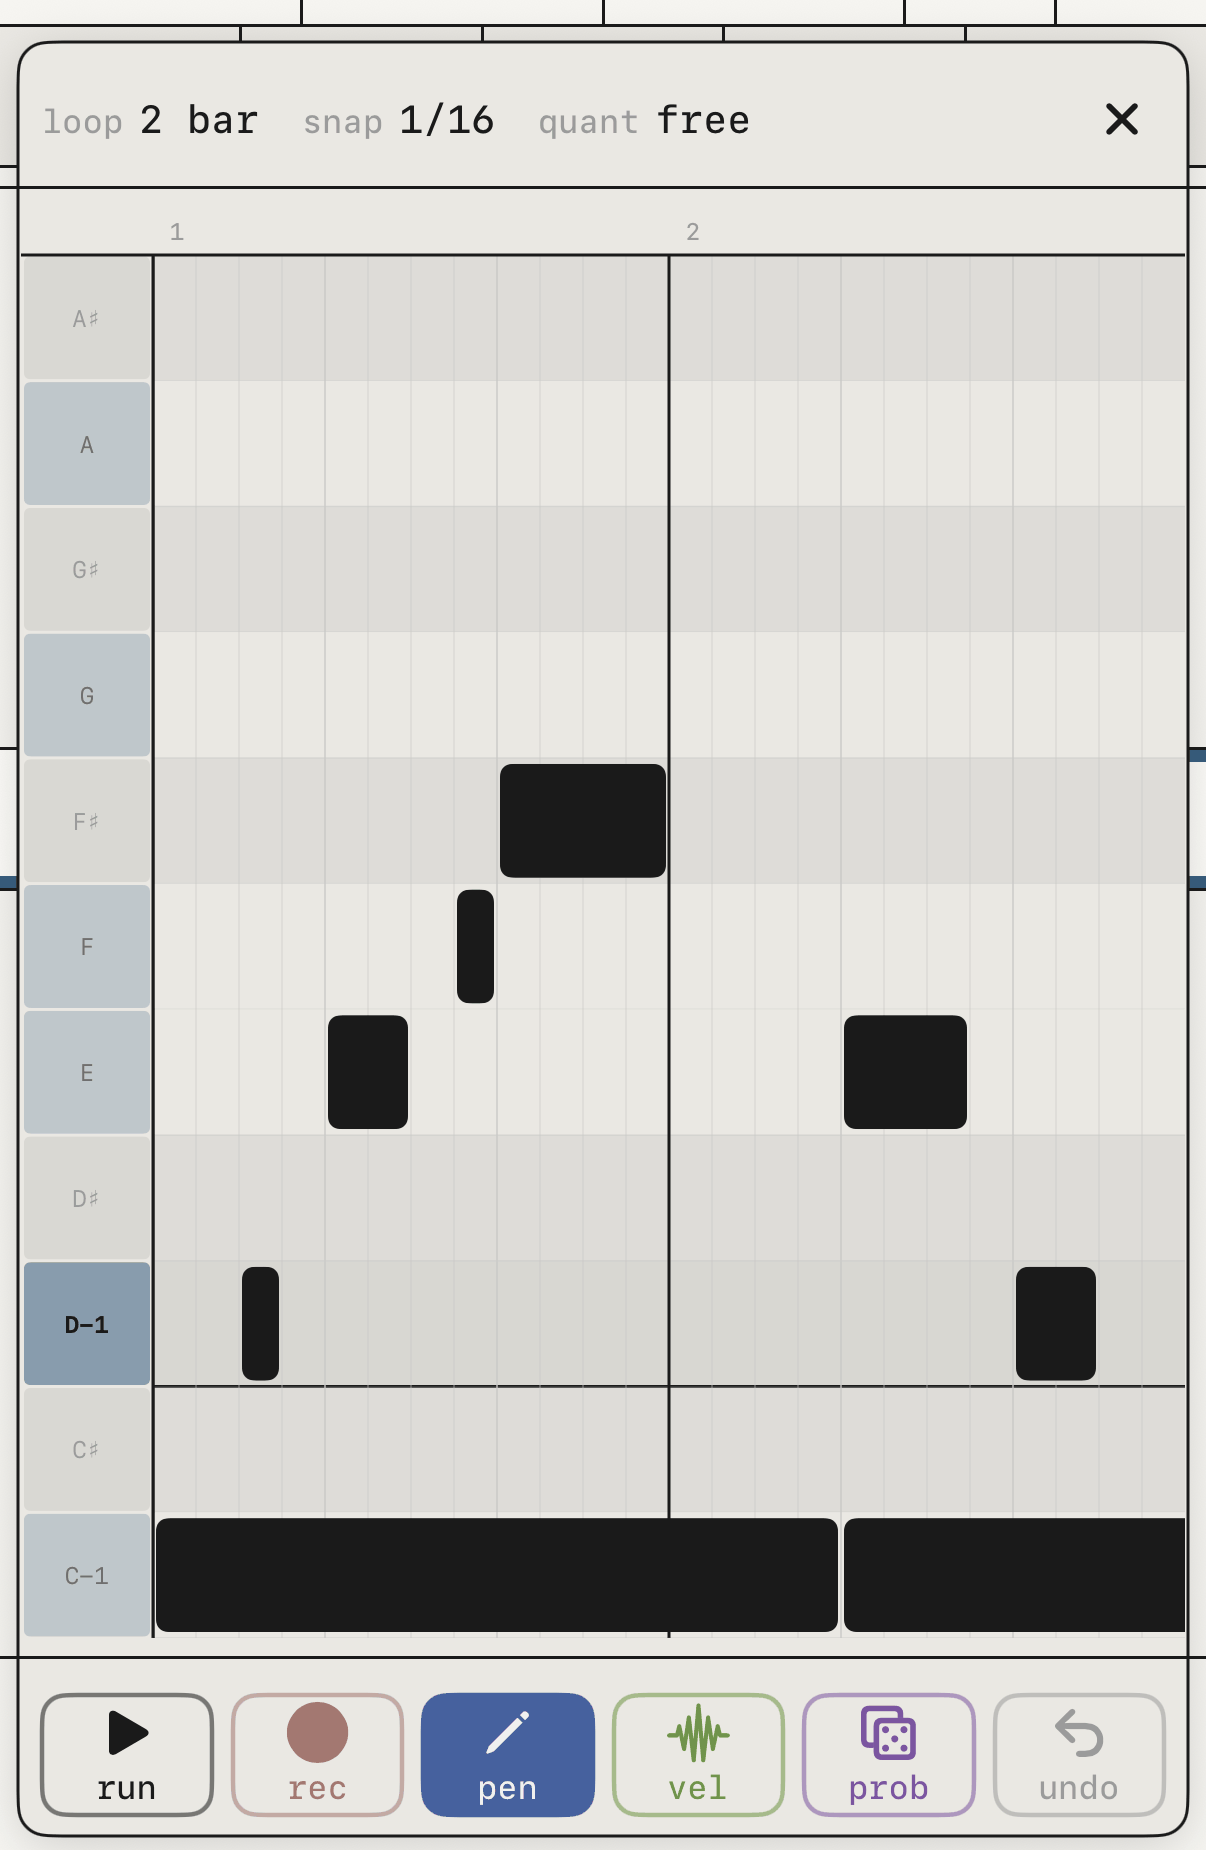
eucalyptus open in large, with loop, snap and quant at the top.Kit
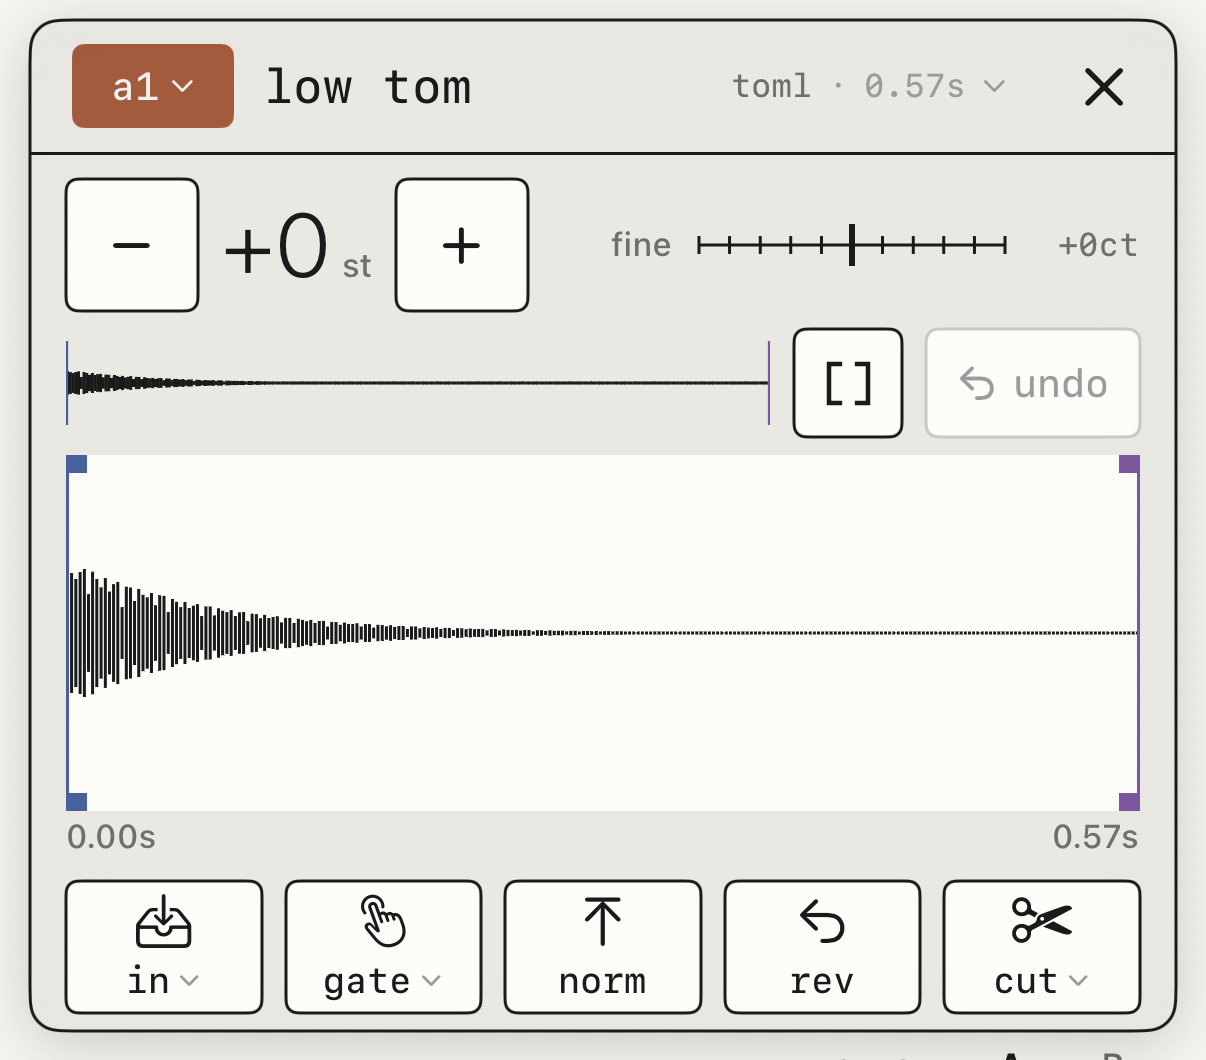
kit is a drum kit with 24 pads in two banks, A and B. Tap a pad to select it, and its sound opens above with in · gate · norm · rev · cut.
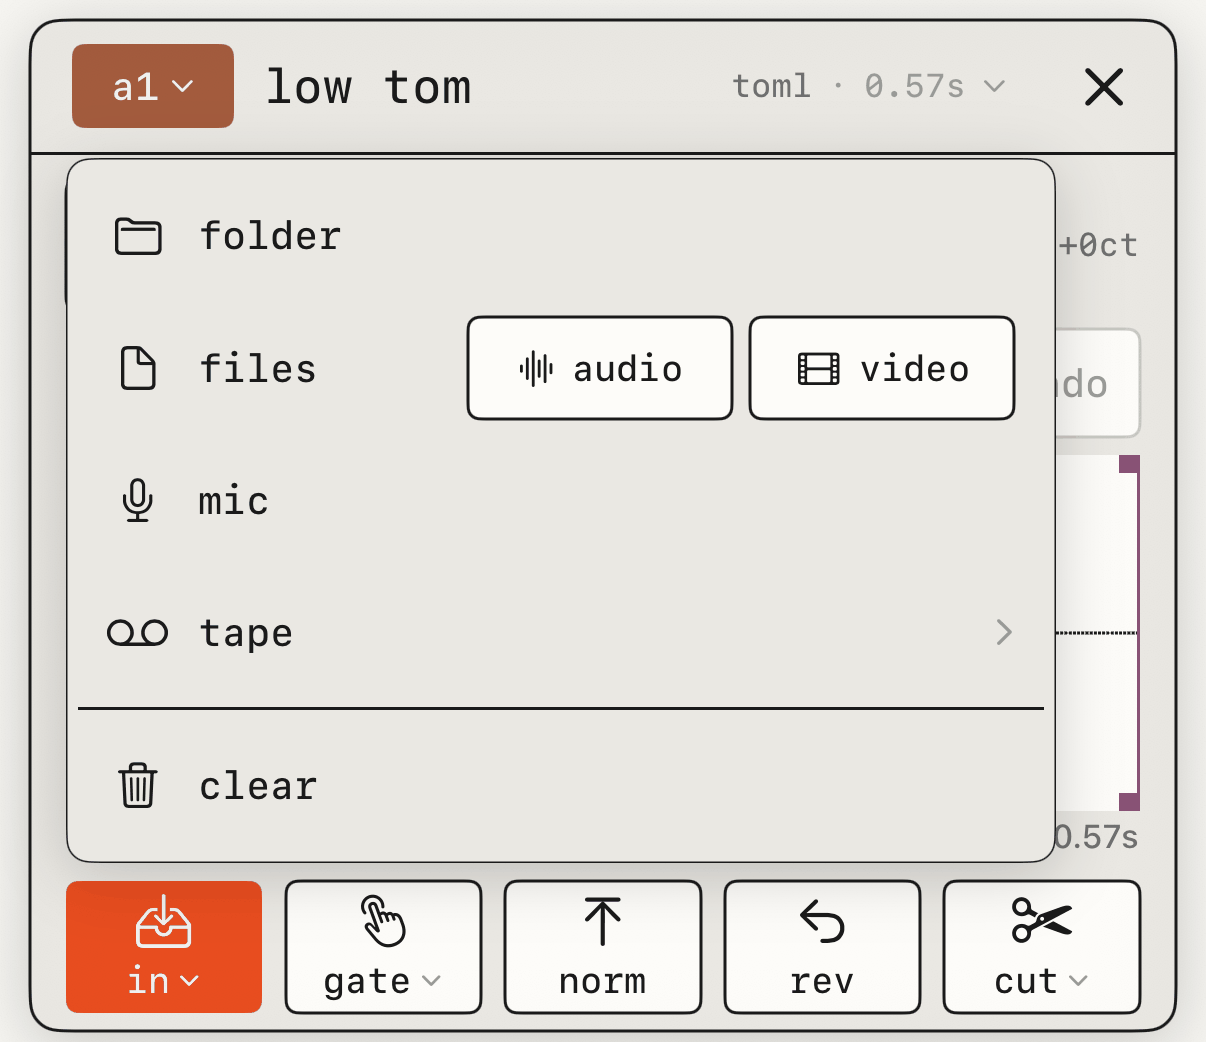
Tap an empty pad to load a sound from your sound folder, from files (audio or video), from the mic or from a track on the tape.
chop slices a sound at the points you mark and spreads the slices over the free pads. You can also mark the cuts by tapping pads while it plays. norm raises a sound's volume up to its peak.
To empty a pad, open in and tap clear, and undo puts it back. Deleting a sound from the library removes it everywhere, including the pads and presets that use it.
Mixing
The mix has four tabs: fx 1 · fx 2 · mix · eq.
Channel strips
In mix there's one strip per track, and they all fit on screen.
inis the input gain when you record a single source.panplaces the track left or right.sd1andsd2send the track tofx 1andfx 2.- The fader has its meter, and
mmutes the track.
Above the strips, drive pushes the whole mix into the limiter, from −12 to +12 dB. The higher you set it, the tighter it sounds.
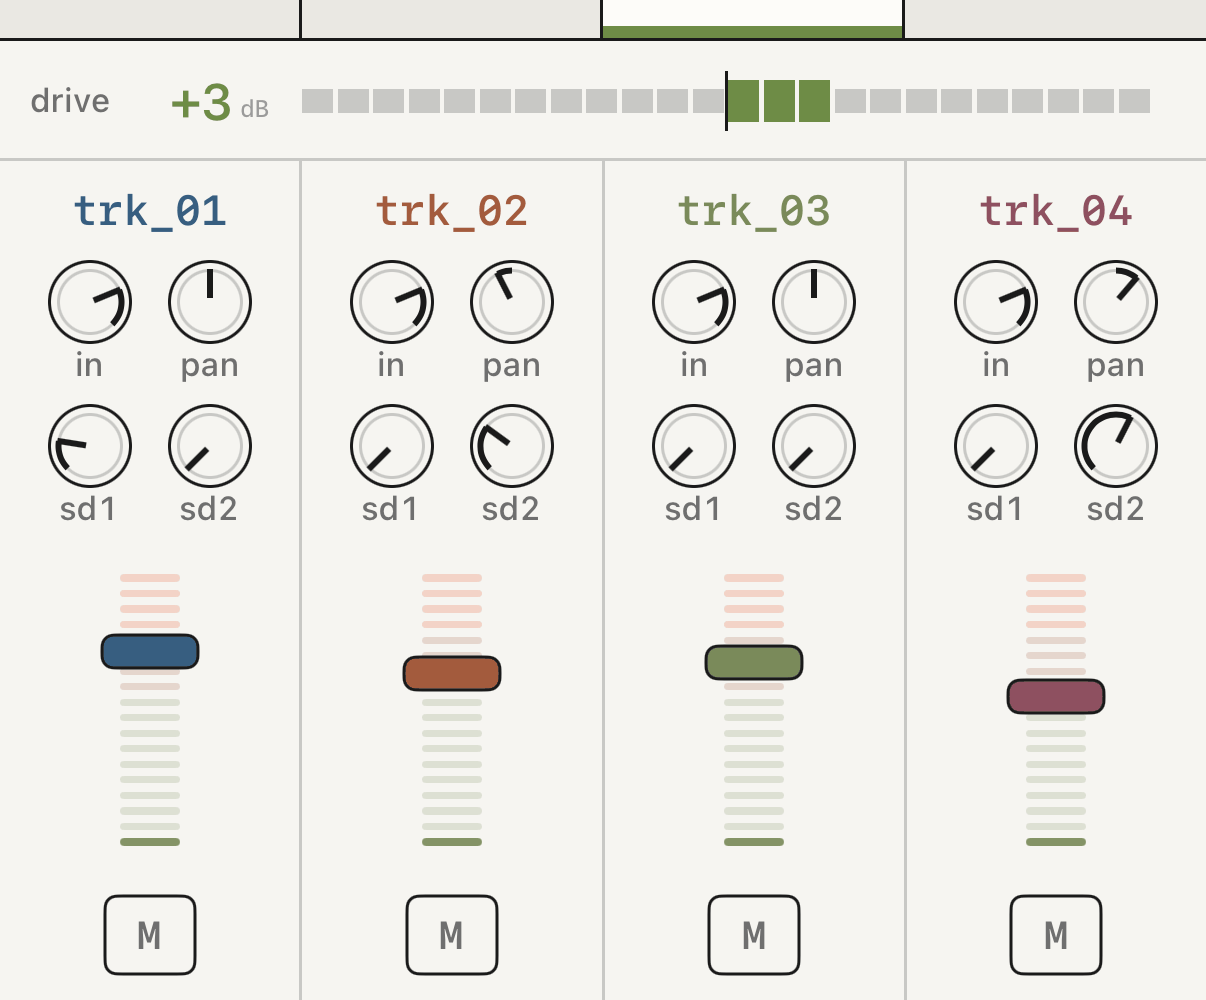
mix strips, with drive on top.Effects
fx 1 and fx 2 are two shared effects, and each track sends to them with sd1 and sd2. Tap an empty bus to choose tapesat · delay · reverb · crush · haze · wobble · shimmer, or plugins to use an AUv3 from another app.
Each effect has four knobs from 00 to 99. Drag vertically to move one, and double tap to reset it. At the top, active switches the effect off without losing anything, return sets its level and change swaps it for another.
Most effects add to the track, which keeps sounding as before. crush, haze and wobble replace it: the more you send, the less of the original you hear, and with the send at the top you only hear the effect.
While you play, you hear the armed track through its effects. The take is recorded without them.
Every knob is listed in the effect cards.
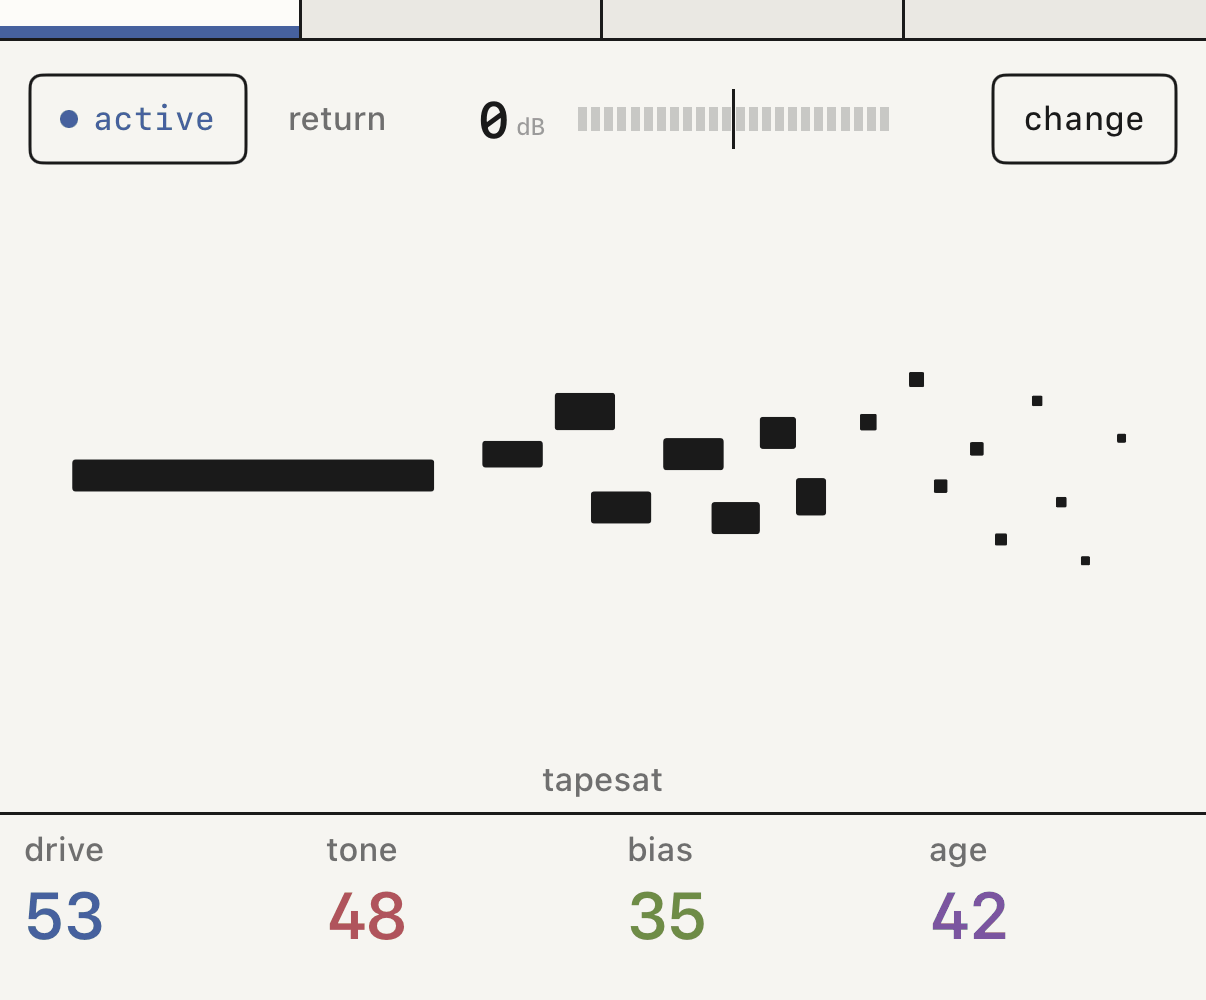
fx 1 with tapesat and its four knobs.Plugins from other apps
Choose plugins on a bus to see the AUv3 effects you have installed, grouped by maker. open ui opens the plugin's screen, which on iPad comes up in a floating window you can resize. The tempo syncs on its own, and the plugin's state is saved with the tape.
Master EQ
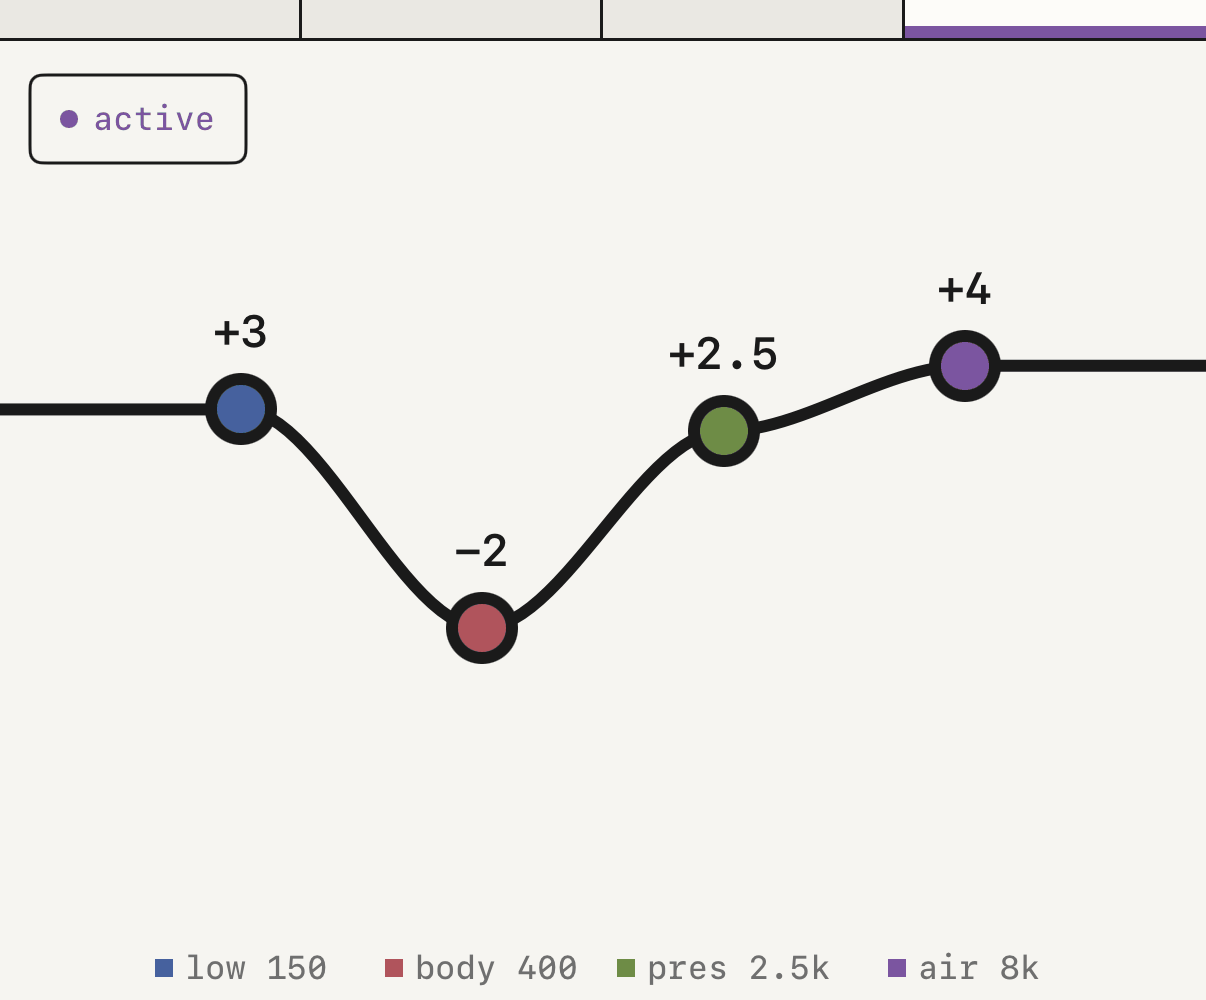
eq is a full-screen curve with four fixed bands: low 150 Hz · body 400 Hz · pres 2.5 kHz · air 8 kHz. Drag a band up or down by up to 8 dB, and double tap to flatten it.
Pinch with two fingers to scale all four bands at once. A chip switches the whole eq off and keeps the curve.
Where the sound goes
Each track goes through its strip and its sends. Then everything comes together and goes through drive, the eq and the limiter on the way out, so whatever you boost in the eq also pushes into the limiter.
Tapes and export
Each project is a tape.
Your tapes
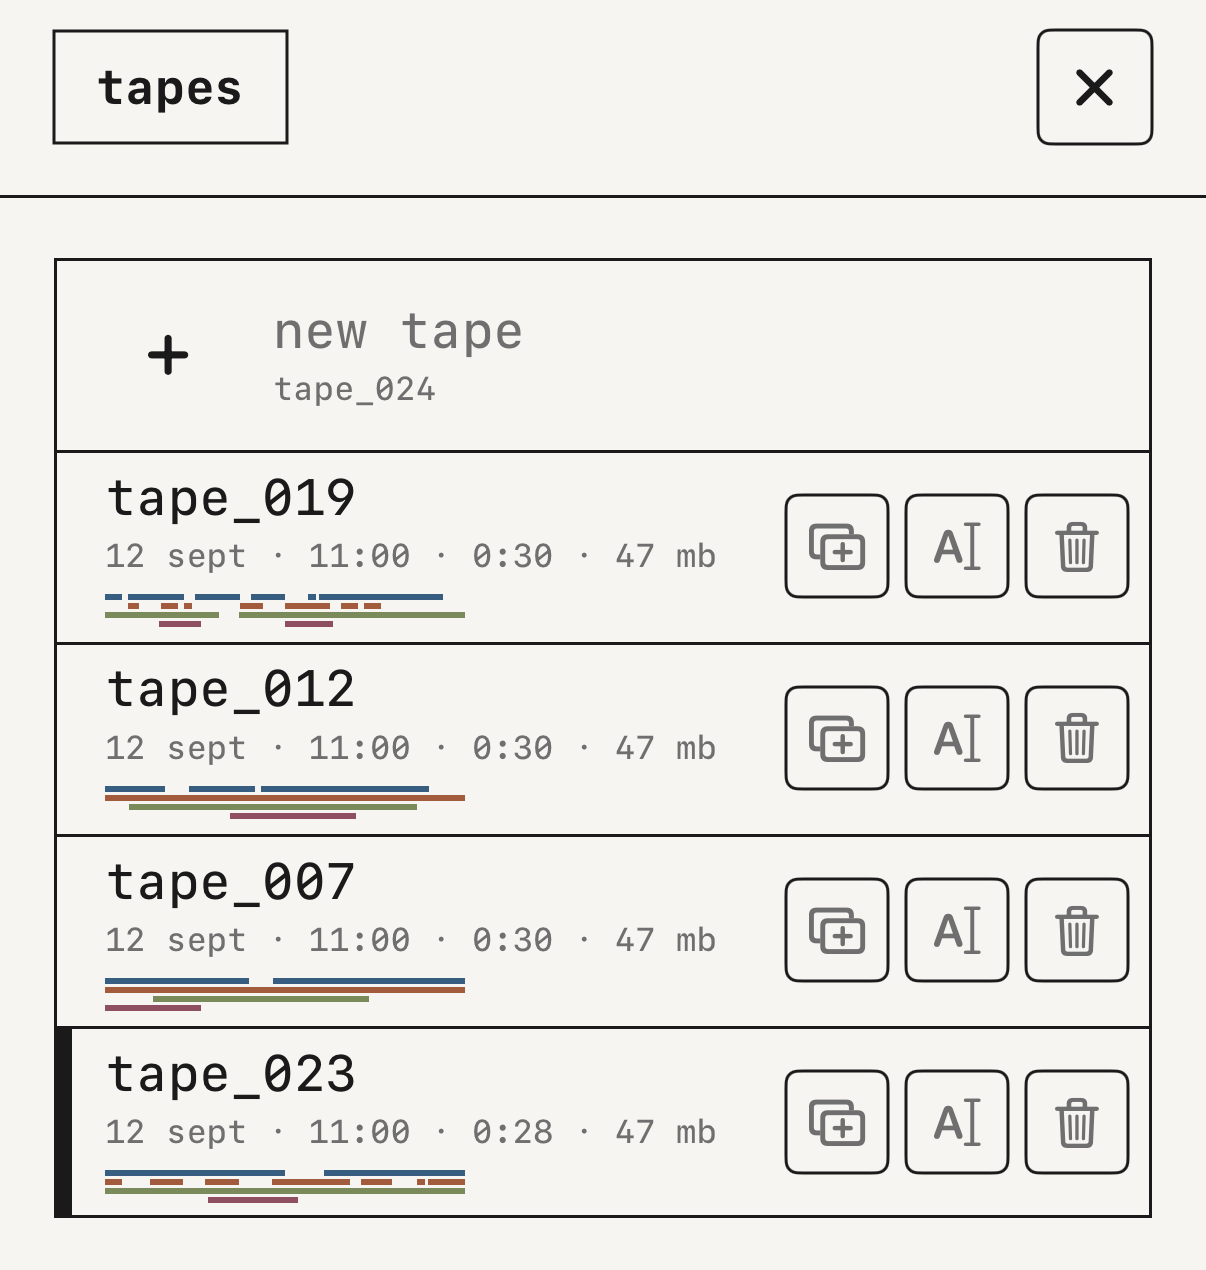
Tap project in the header to open tapes. There you create a new tape, and on each tape's row you duplicate, rename or delete it. Deleting asks you to confirm and can't be undone.
A tape keeps its tracks and its mix, the tempo, the time signature, the loop points and the effects. A new tape starts at 120 BPM with the number of tracks set in tracks.
Export
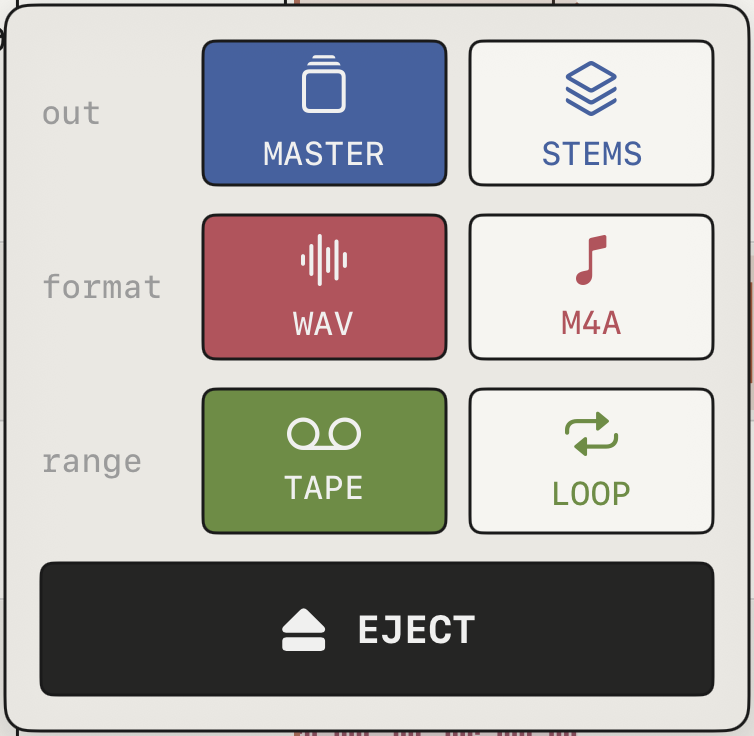
Tap the eject icon in the header. The panel has three choices.
outismaster, the full mix, orstems, one file per track.formatiswav(24-bit, lossless) orm4a(compressed).rangeis the wholetapeor one cycle of yourloop.
Press eject and the file goes out through the iOS share sheet, to Files, AirDrop or another app.
The export sounds the same as playback. In master, muted tracks stay silent and the limiter applies. In stems, each file carries its full audio even if the track is muted, with the drive and the eq but without the limiter.
If the tape ends on a reverb or delay tail, up to 12 extra seconds are exported. In loop, up to 2 seconds of that tail fold over the start so the cycle closes without a jump.
The synth is only in the export once you've recorded it onto a track. See recording the synth.
eject button.With other apps
Syncing tempo
settings ▸ sync has two ways to share tempo.
midi clock sends your tempo with out or follows another device's with in, start and stop included, over USB, Bluetooth or the network.
link opens the Ableton Link panel so you can play in time with other apps on the same network. While link is on, midi clock is off and locked.
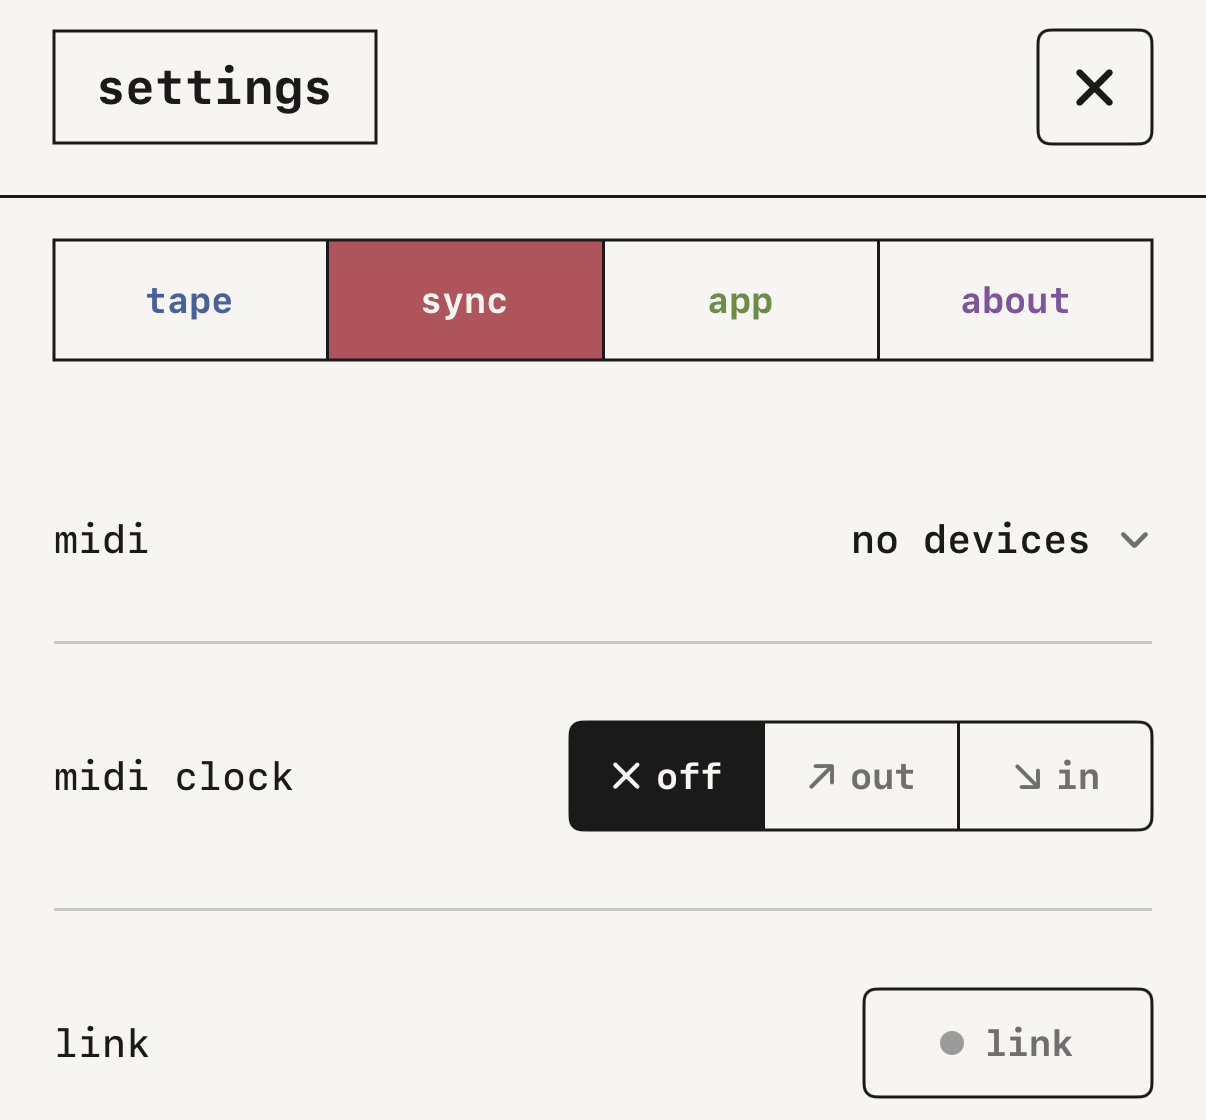
midi clock and link in the sync settings.Playing from a MIDI keyboard groovebox
A MIDI keyboard connected over USB, Bluetooth or the network plays the synth, listening on every channel by default. Pick the device and the channel in settings ▸ sync ▸ midi. Sustain and pitch bend work.
TapeDesk also shows up as a MIDI port for other apps on the same device, such as AUM or Drambo.
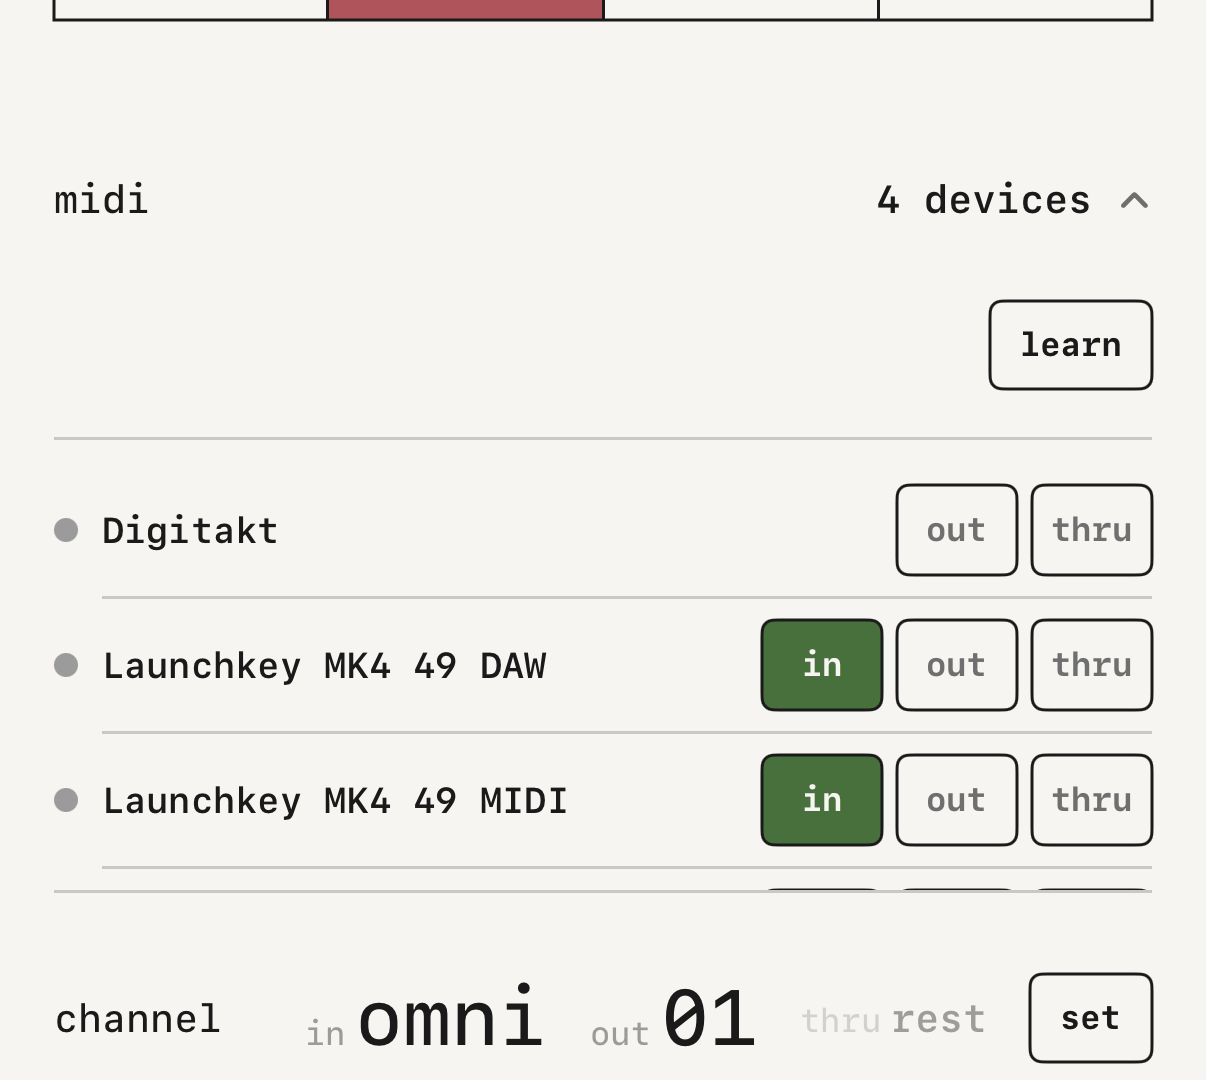
MIDI learn
learn assigns a knob on your controller to almost any control in the app: the transport, the faders, pan, the sends, mute, the effect knobs and the eq bands.
Turn it on in settings ▸ sync ▸ midi, and every assignable control shows a set plate. Tap a plate and move the physical knob to assign it. Press done to leave.
The synth macros and stepping from one preset to the next can be assigned too.
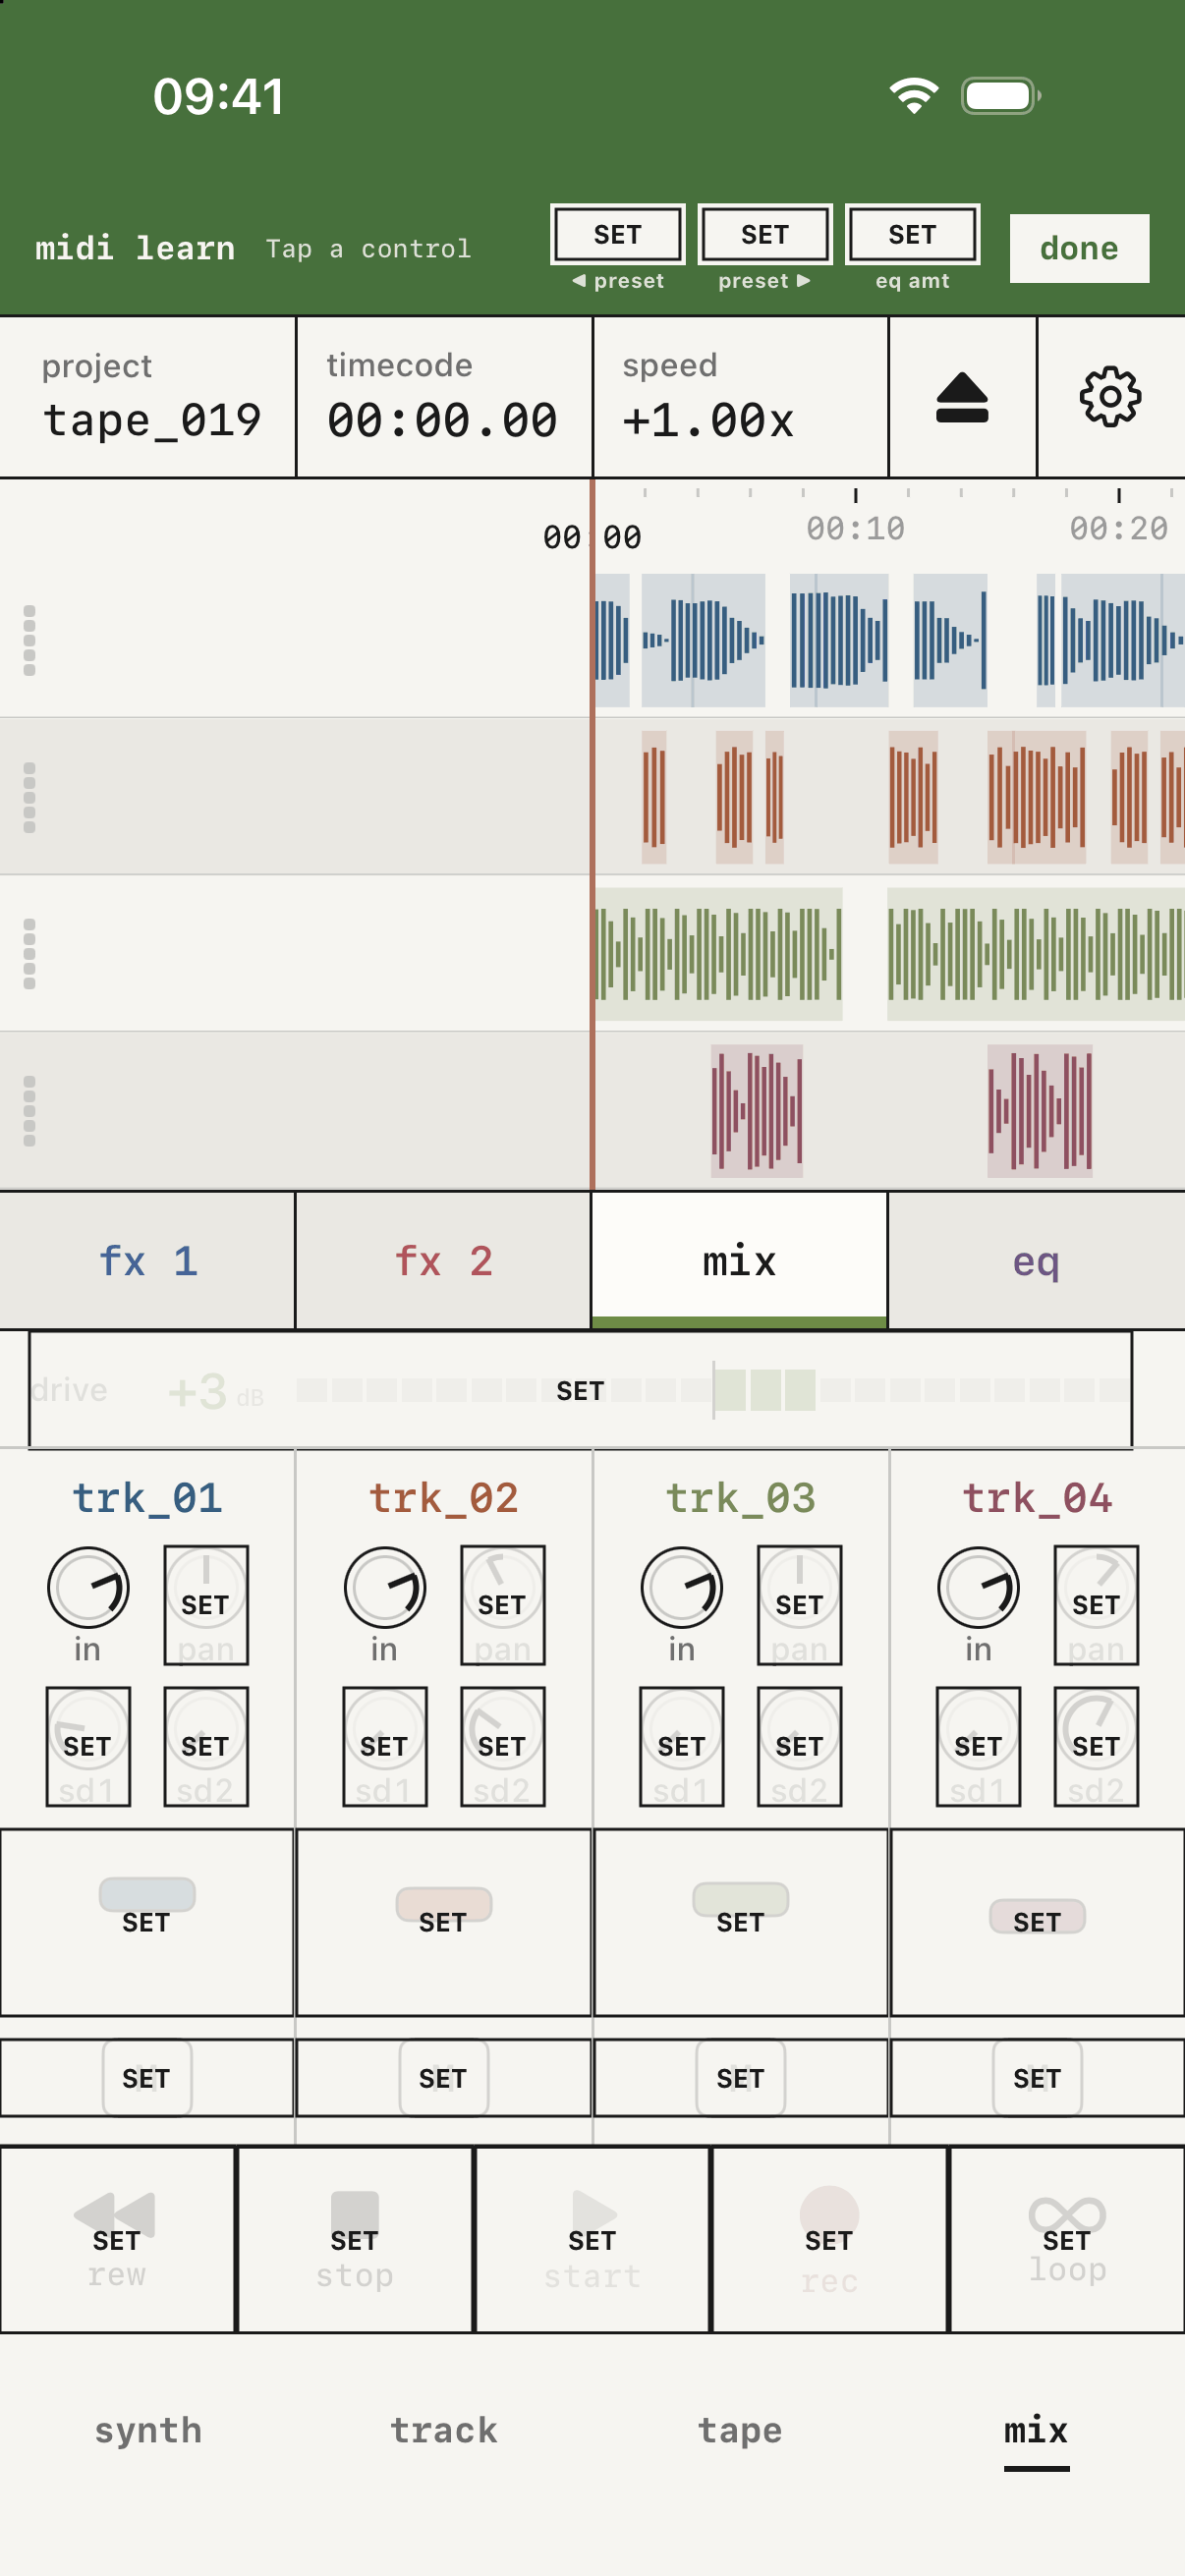
learn on, with the plates over the mix.TapeDesk as a plugin
TapeDesk also opens as an AUv3 plugin inside another app. TapeDesk: Tape is the tape with its mix, and its tapes are the same ones you see in the app.
clock, at the top, has two options.
hostis the default. Pressarmand the host's play starts recording, at the host's tempo.tapegives you the full transport and your own tempo.
With host you can still move the tape. Drag it where you want and let go, and from there it starts and stops with the host. This helps with clip-based hosts, which have no timeline and never go back to zero. Switching to tape and back to host makes the tape follow the host again.
With sources, the plugin takes up to six inputs from the host, each onto the track you choose, and records them all at once, in the loop and with the threshold too. thru lets you hear the host's input at the output. The host can automate the whole mix.
TapeDesk: Tape inside a host.TapeDesk: Play groovebox
TapeDesk: Play is the synth as an instrument inside another app. It takes notes, sustain and pitch bend from the host, and offers 37 parameters to automate.
The sound is saved with the host's session. The presets, scales and DX cartridges are the same as in the app.
TapeDesk: Play inside a host, with the keyboard open.Reference
This part is for looking things up: the knobs of every engine and effect, the settings, the index of terms and the licenses.
Engines groovebox
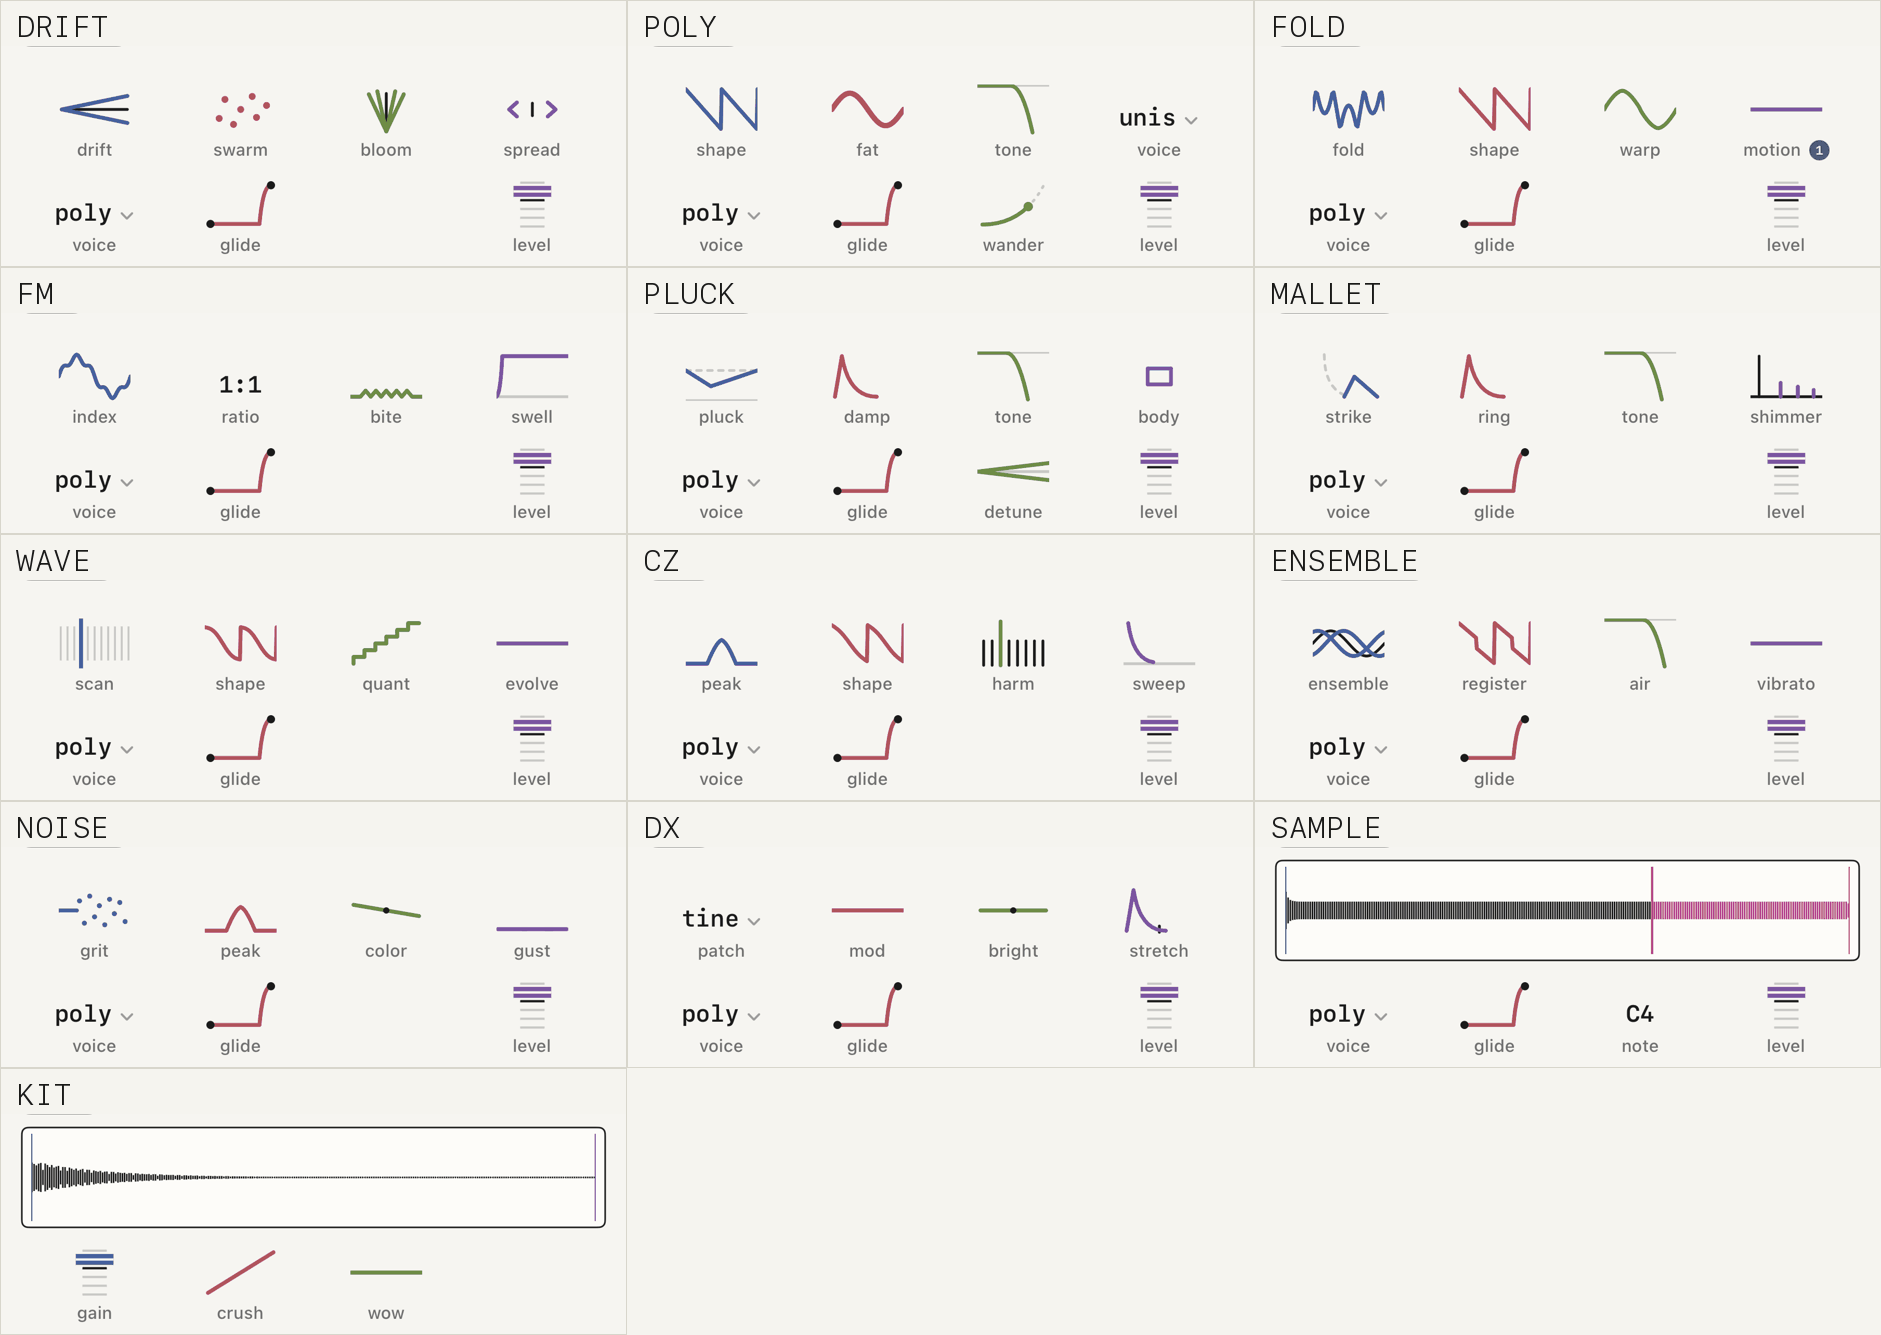
The eleven synthesis engines are built on Plaits, by Émilie Gillet (Mutable Instruments). sample and kit play samples.
drift
analog swarm, stereo
drift- from a still swarm to a shifting cloud
swarm- how many voices
bloom- detune towards the center
spread- detune towards the sides, more stereo
poly
virtual analog
shape- from warm to a hard-sync bite
fat- thickness of the saw wave
tone- brightness
voice- interval per voice, unison, fifth, octave or octave and fifth
fold
wavefolding
fold- amount of folding
shape- starting waveform
warp- warm at the bottom, metallic at the top
motion- a slow LFO that makes the folding breathe
fm
two-operator FM
index- from sine to bell to clang
ratio- interval between operators, in steps
bite- feedback, from clean to buzz
swell- swells the sound after the attack
pluck
plucked string, dies away on its own
pluck- brightness of the pluck
damp- how long it rings
tone- from warm to metallic
body- body resonance
mallet
tuned percussion, dies away on its own
strike- hardness of the hit
ring- how long it rings
tone- from dark to metallic
shimmer- brightness of the high harmonics
wave
wavetable
scan- position in the table
shape- wave family
quant- from clean to lo-fi
evolve- moves through the table on its own
cz
phase distortion
peak- depth of the resonance
shape- shape of the window
harm- harmonic of the resonance, in steps
sweep- formant sweep on each note
ensemble
string machine, stereo
ensemble- amount of chorus
register- from saw to square
air- filter opening following the note
vibrato- vibrato per note
noise
noise and texture
grit- from crackly steps to hiss
peak- filter resonance
color- low-pass, band-pass or high-pass
gust- gusts per note that never repeat
dx
six-operator FM, dies away on its own
patch- one of the bank's 32 patches
mod- depth of the patch's LFO
bright- brightness
stretch- stretches or shrinks the envelopes
.syx cartridges load with import .syx, in dx cart.
sample
keyboard sampler
note- the actual note of the sample
Tap the waveform to trim it and set the loop.
Fx inserts groovebox
Each engine has its own effect in its fx tab, working inside the sound, note by note.
chorus
rate- speed
depth- depth
fbk- feedback, hollow when negative and resonant when positive
voices- from 1 to 4 voices
delay- base delay, short shimmers and long sounds like vibrato
width- stereo width
mix- mix
drive
the same engine as tapesat
gain- amount of saturation, with the volume compensated
tone- filter after the saturation
bias- asymmetry
edge- even more saturation
char- another asymmetry setting
mix- mix
out- output level, ±12 dB
phaser
rate- sweep speed
depth- sweep amount
fbk- resonance, from airy to vocal
stages- from 2 to 12 stages
center- center of the sweep
spread- offset between left and right
mix- how deep the notches cut
delay
the same engine as the mix delay
time- up to 1.2 s, or tempo divisions with
sync fbk- repeats
tone- darkens each repeat
pingpng- bounces the repeats between left and right
sync- ties
timeto the tempo mod- tape wobble
mix- mix
space
the same engine as the mix reverb
size- size
decay- length of the tail
damp- how the highs die away
tone- brightness
mod- spring shimmer
mix- mix
dirt
fuzz
gain- input to the fuzz
fold- wavefolding
bias- more fuzz on one side and silence on the other
crush- lowers the sample rate down to 300 Hz
tone- filter after the crush
mix- mix
out- output level, ±12 dB
au
an AUv3 effect from another app
return- effect level, ±12 dB
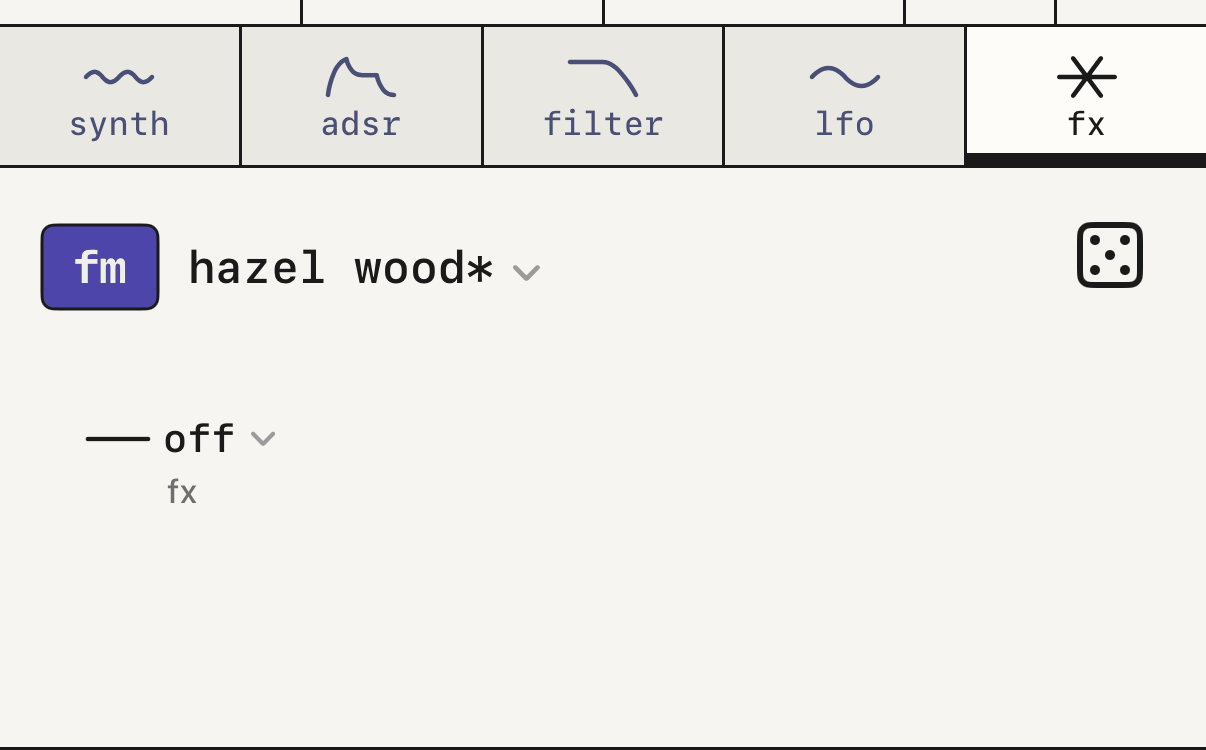
fx tab with space loaded.Mix effects
These are the effects you load in fx 1 and fx 2.
tapesat
tape saturation, adds
drive- how hard the signal hits the tape, with the volume compensated
tone- high-end roll-off, from 200 Hz to 20 kHz
bias- asymmetry, adds even harmonics
age- from new tape to an old cassette, with hiss and then wow
delay
tape echo, adds
time- from 30 to 750 ms. Moving it makes the echo glide
fbk- repeats
tone- darkens each repeat
wow- wobble of the delay time
reverb
eight feedback lines, adds
decay- length of the tail
tone- brightness of the room
drip- spring shimmer
damp- how the highs die away in the tail
crush
lower sample rate and fewer bits, replaces
rate- from 48 kHz down to 1.5 kHz
bits- from 16 down to 3
grit- from steps to noise
tone- high-cut filter
haze
moving filter, replaces
freq- starting cutoff, from 80 Hz to 8 kHz
move- to the left the signal moves it, to the right an LFO
res- resonance, self-oscillates near the top
shape- from low-pass to band-pass to phaser
With free the LFO runs from 0.1 to 8 Hz. With sync it follows the tempo.
wobble
tape wobble, replaces
depth- how far the pitch moves
rate- from 0.1 to 8 Hz
shape- from sine to a random walk
drop- dropouts in level and highs
shimmer
octave reverb, adds
shmr- how much octave feeds back in
size- length of the tail
tone- from bright to dark
bloom- how long the cloud takes to rise
Below it you pick the interval, from −12 to +12. The default is +12.
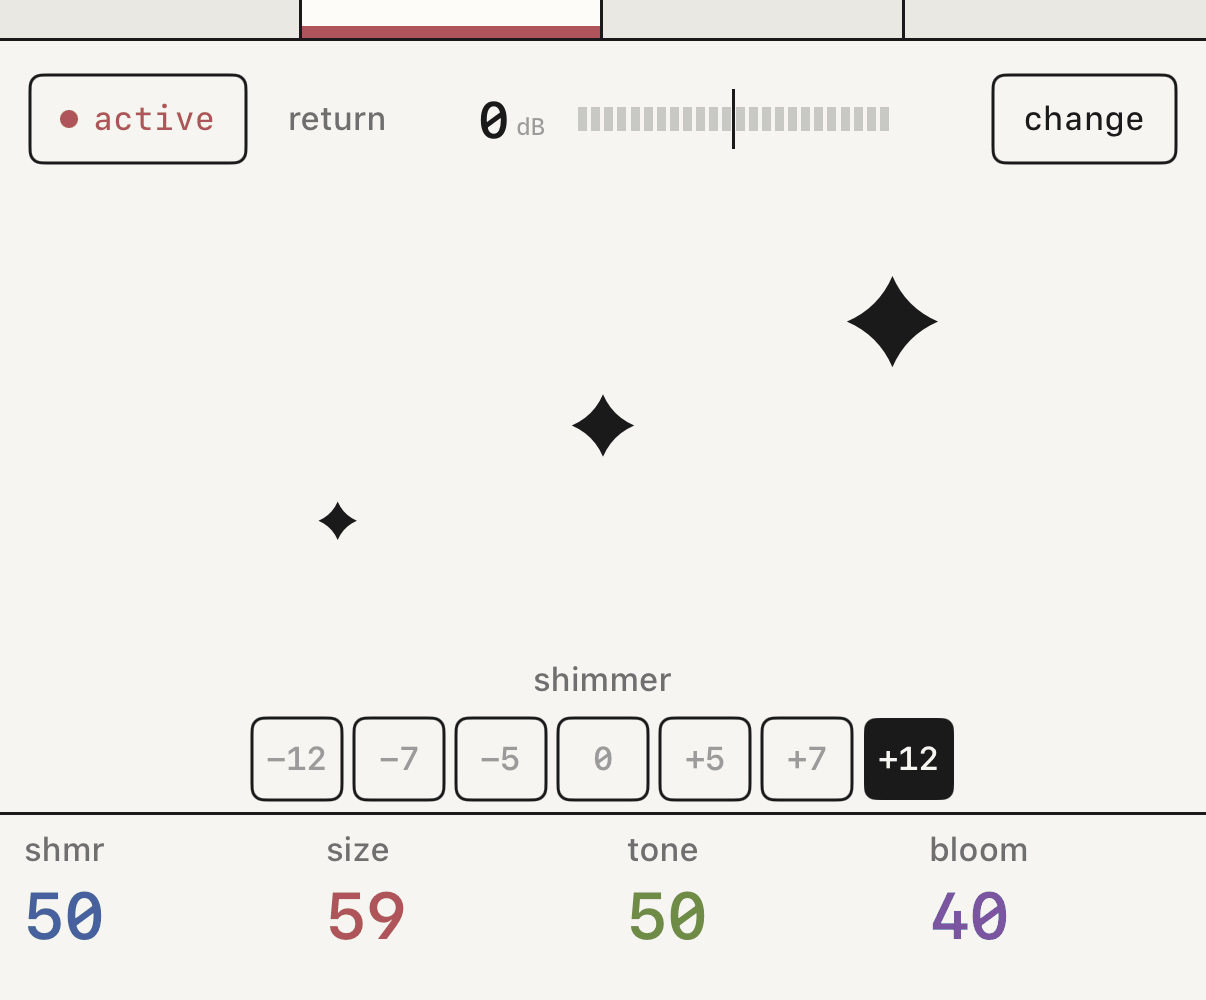
shimmer with the interval chips.Settings
The gear in the header opens the settings, with four tabs.
tape
tracks- how many tracks the tape has, from 4 to 6
tempo- with the wheel or by tapping
time sig- the tape's time signature
count in- count-in before recording
metronome- turns the click on
rec modesosorpunchedit bar- which gesture opens it
regions- how takes are drawn
sync
midi- devices,
learn,channel,seq,out offset,wirelessandpanic midi clockoff·out·inlink- opens Ableton Link
app
moderecorderorgrooveboxthemelight·dark·autovelocity- how much the hit counts when you play keys and pads, from 0 to 5
language- fifteen languages, switches instantly
microphone- permission status
qualitystudiorecords at 24-bit anddemoat 16, which takes less spacestorage- how much space TapeDesk uses
app icon- cream · dark · olive · wine
about
data not collected- links to the privacy policy
manual- opens this manual
rate- to rate the app
support- to get in touch
At the bottom are the version and the credits for the sounds and for Plaits.
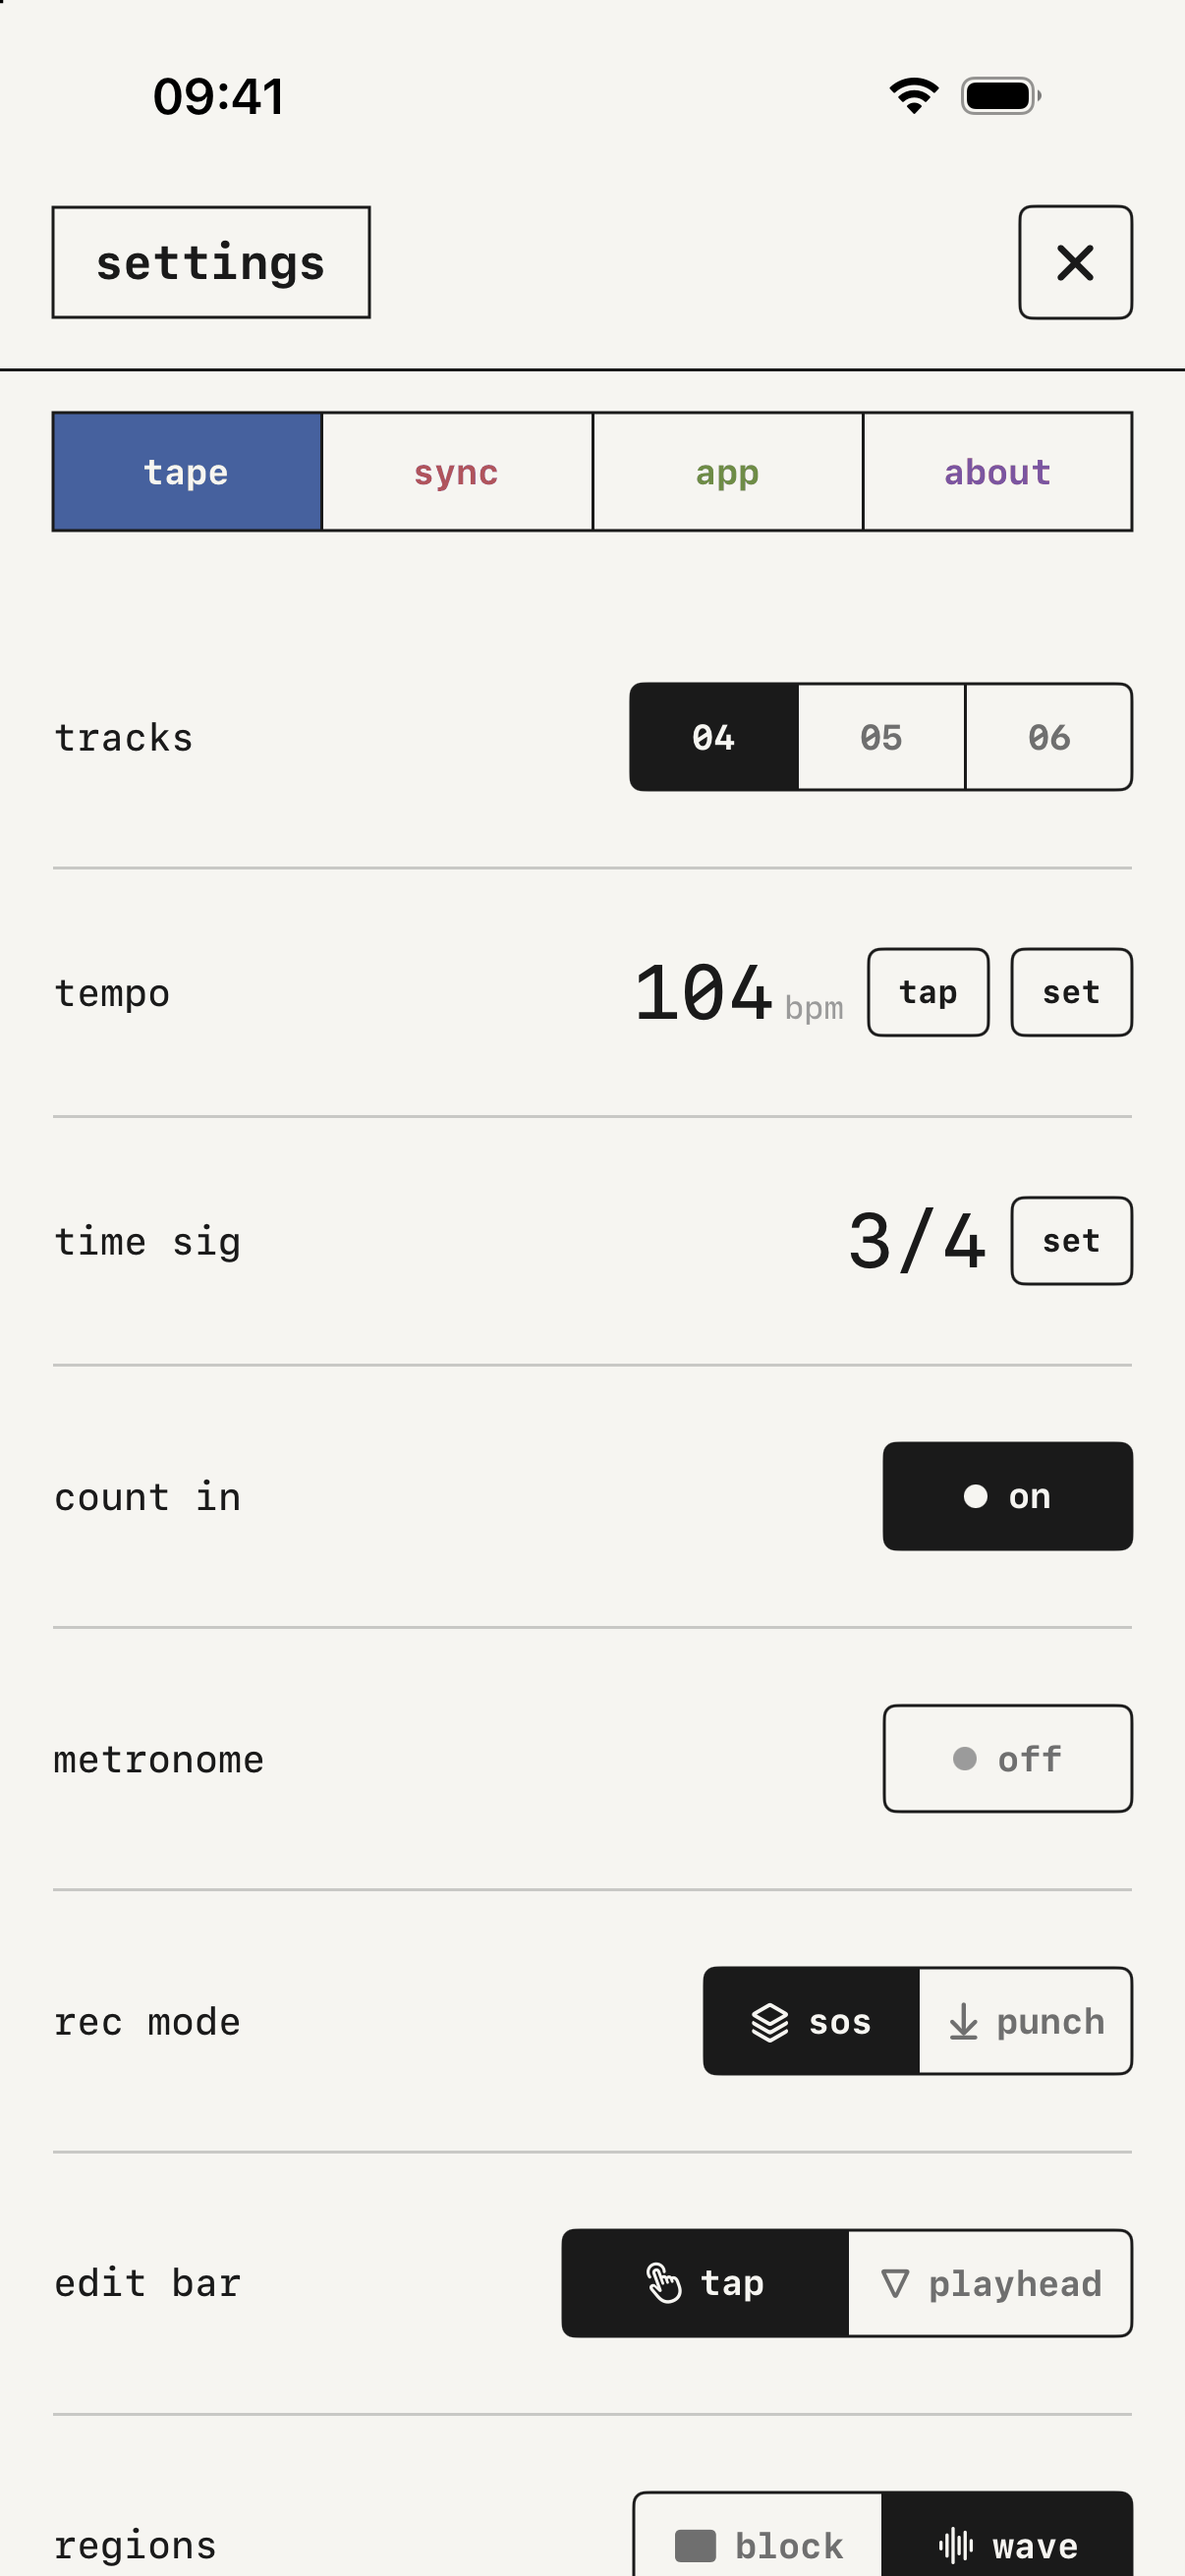
tape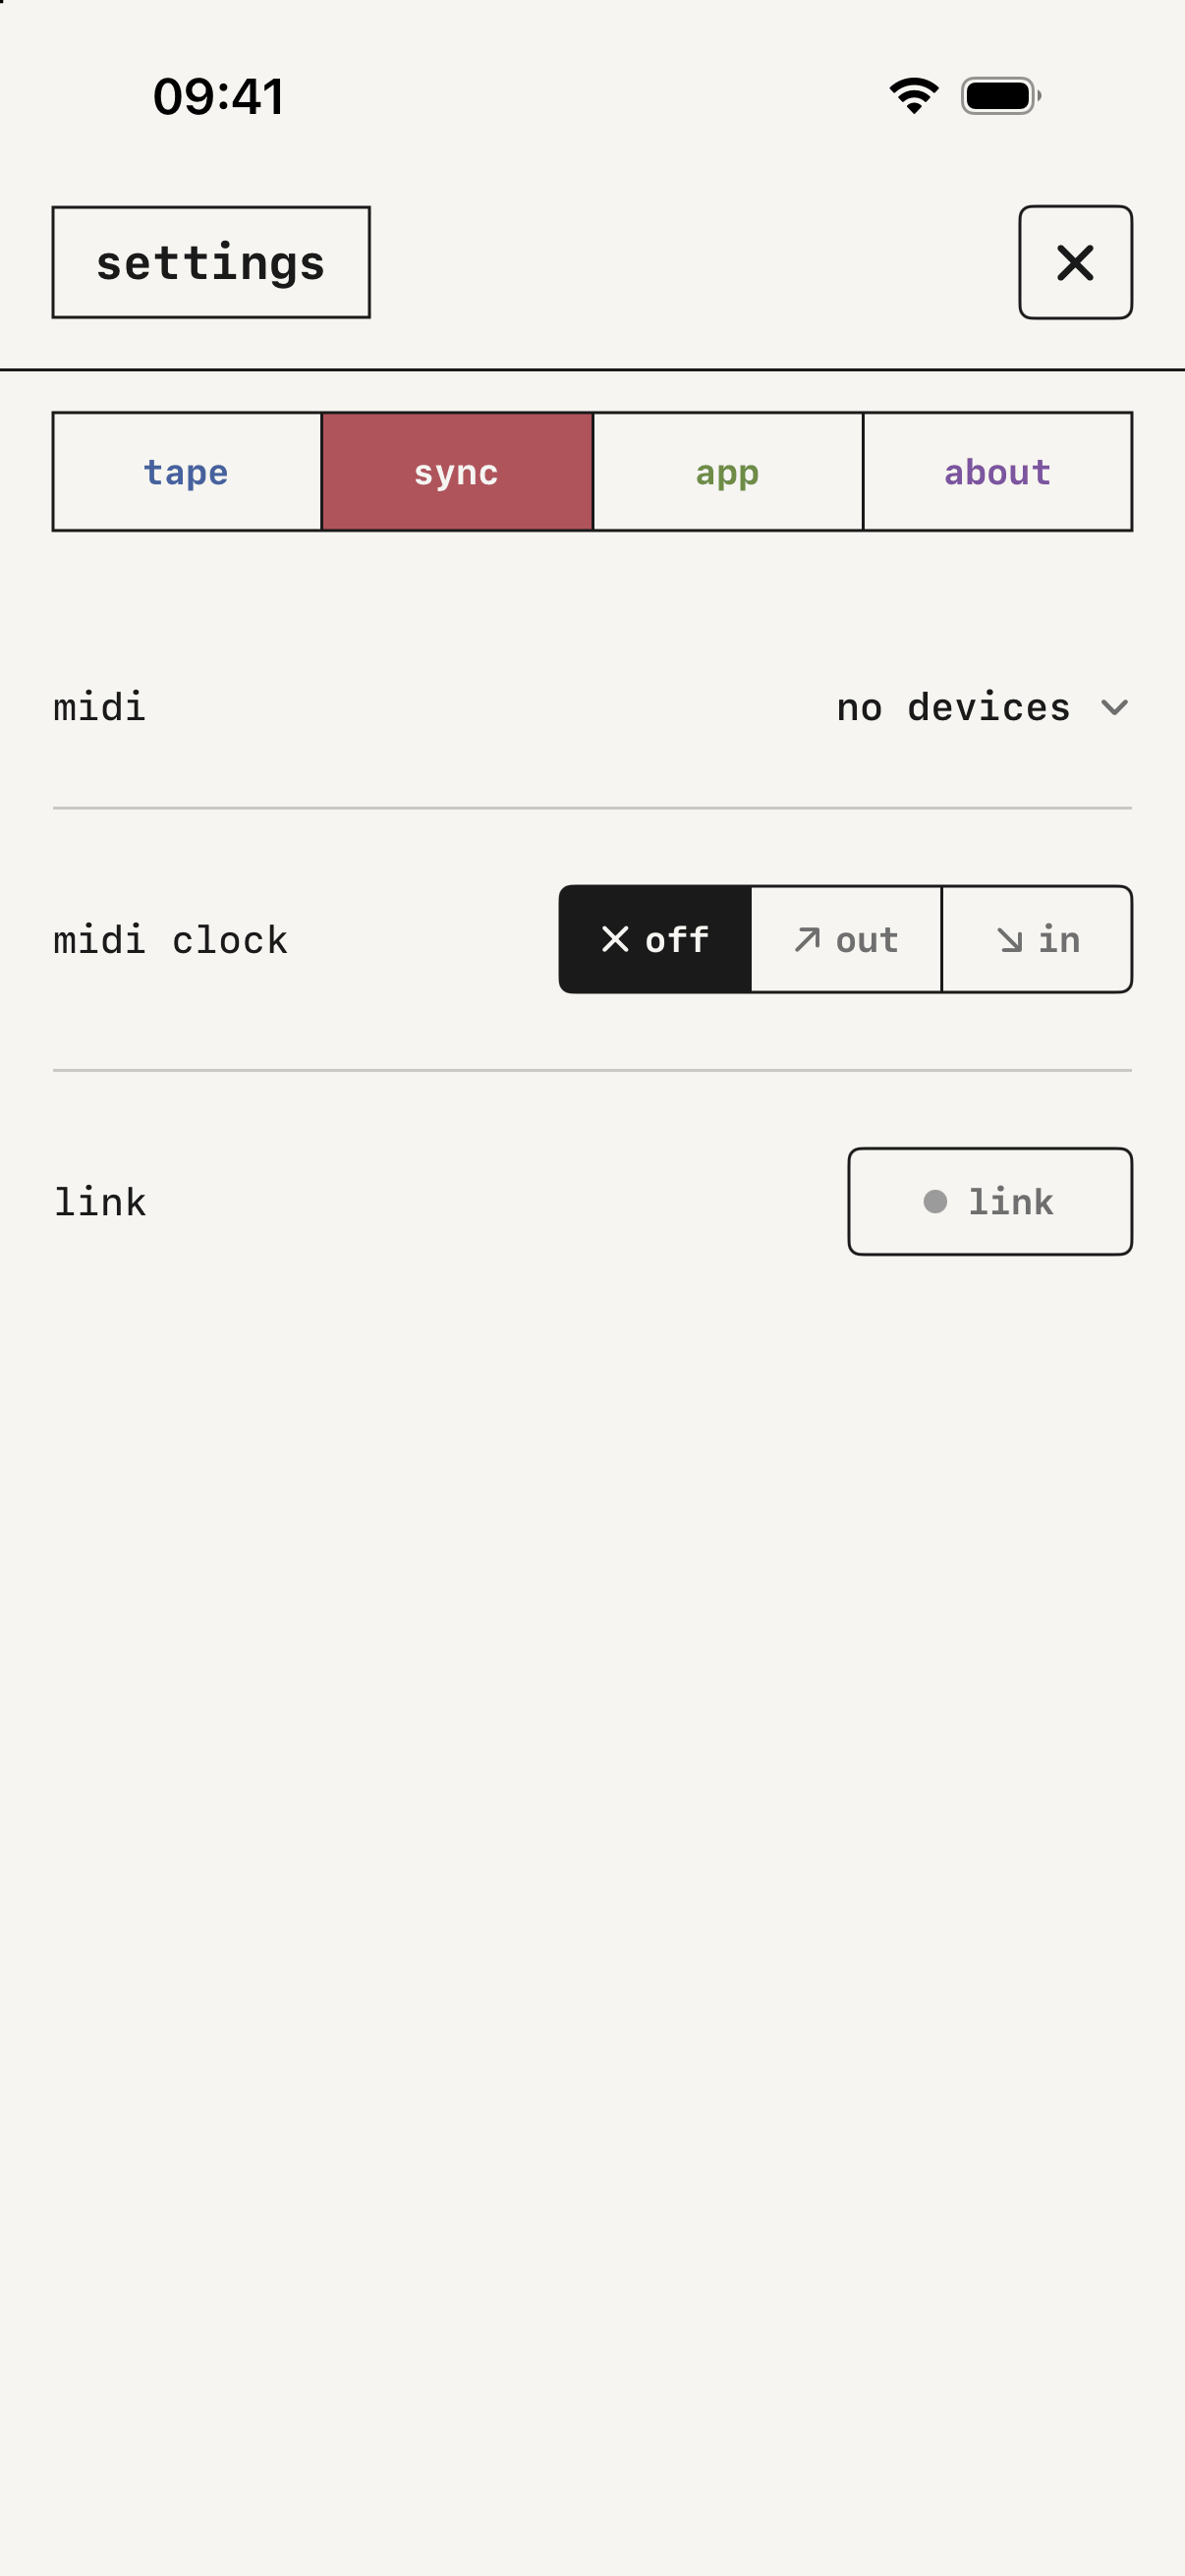
sync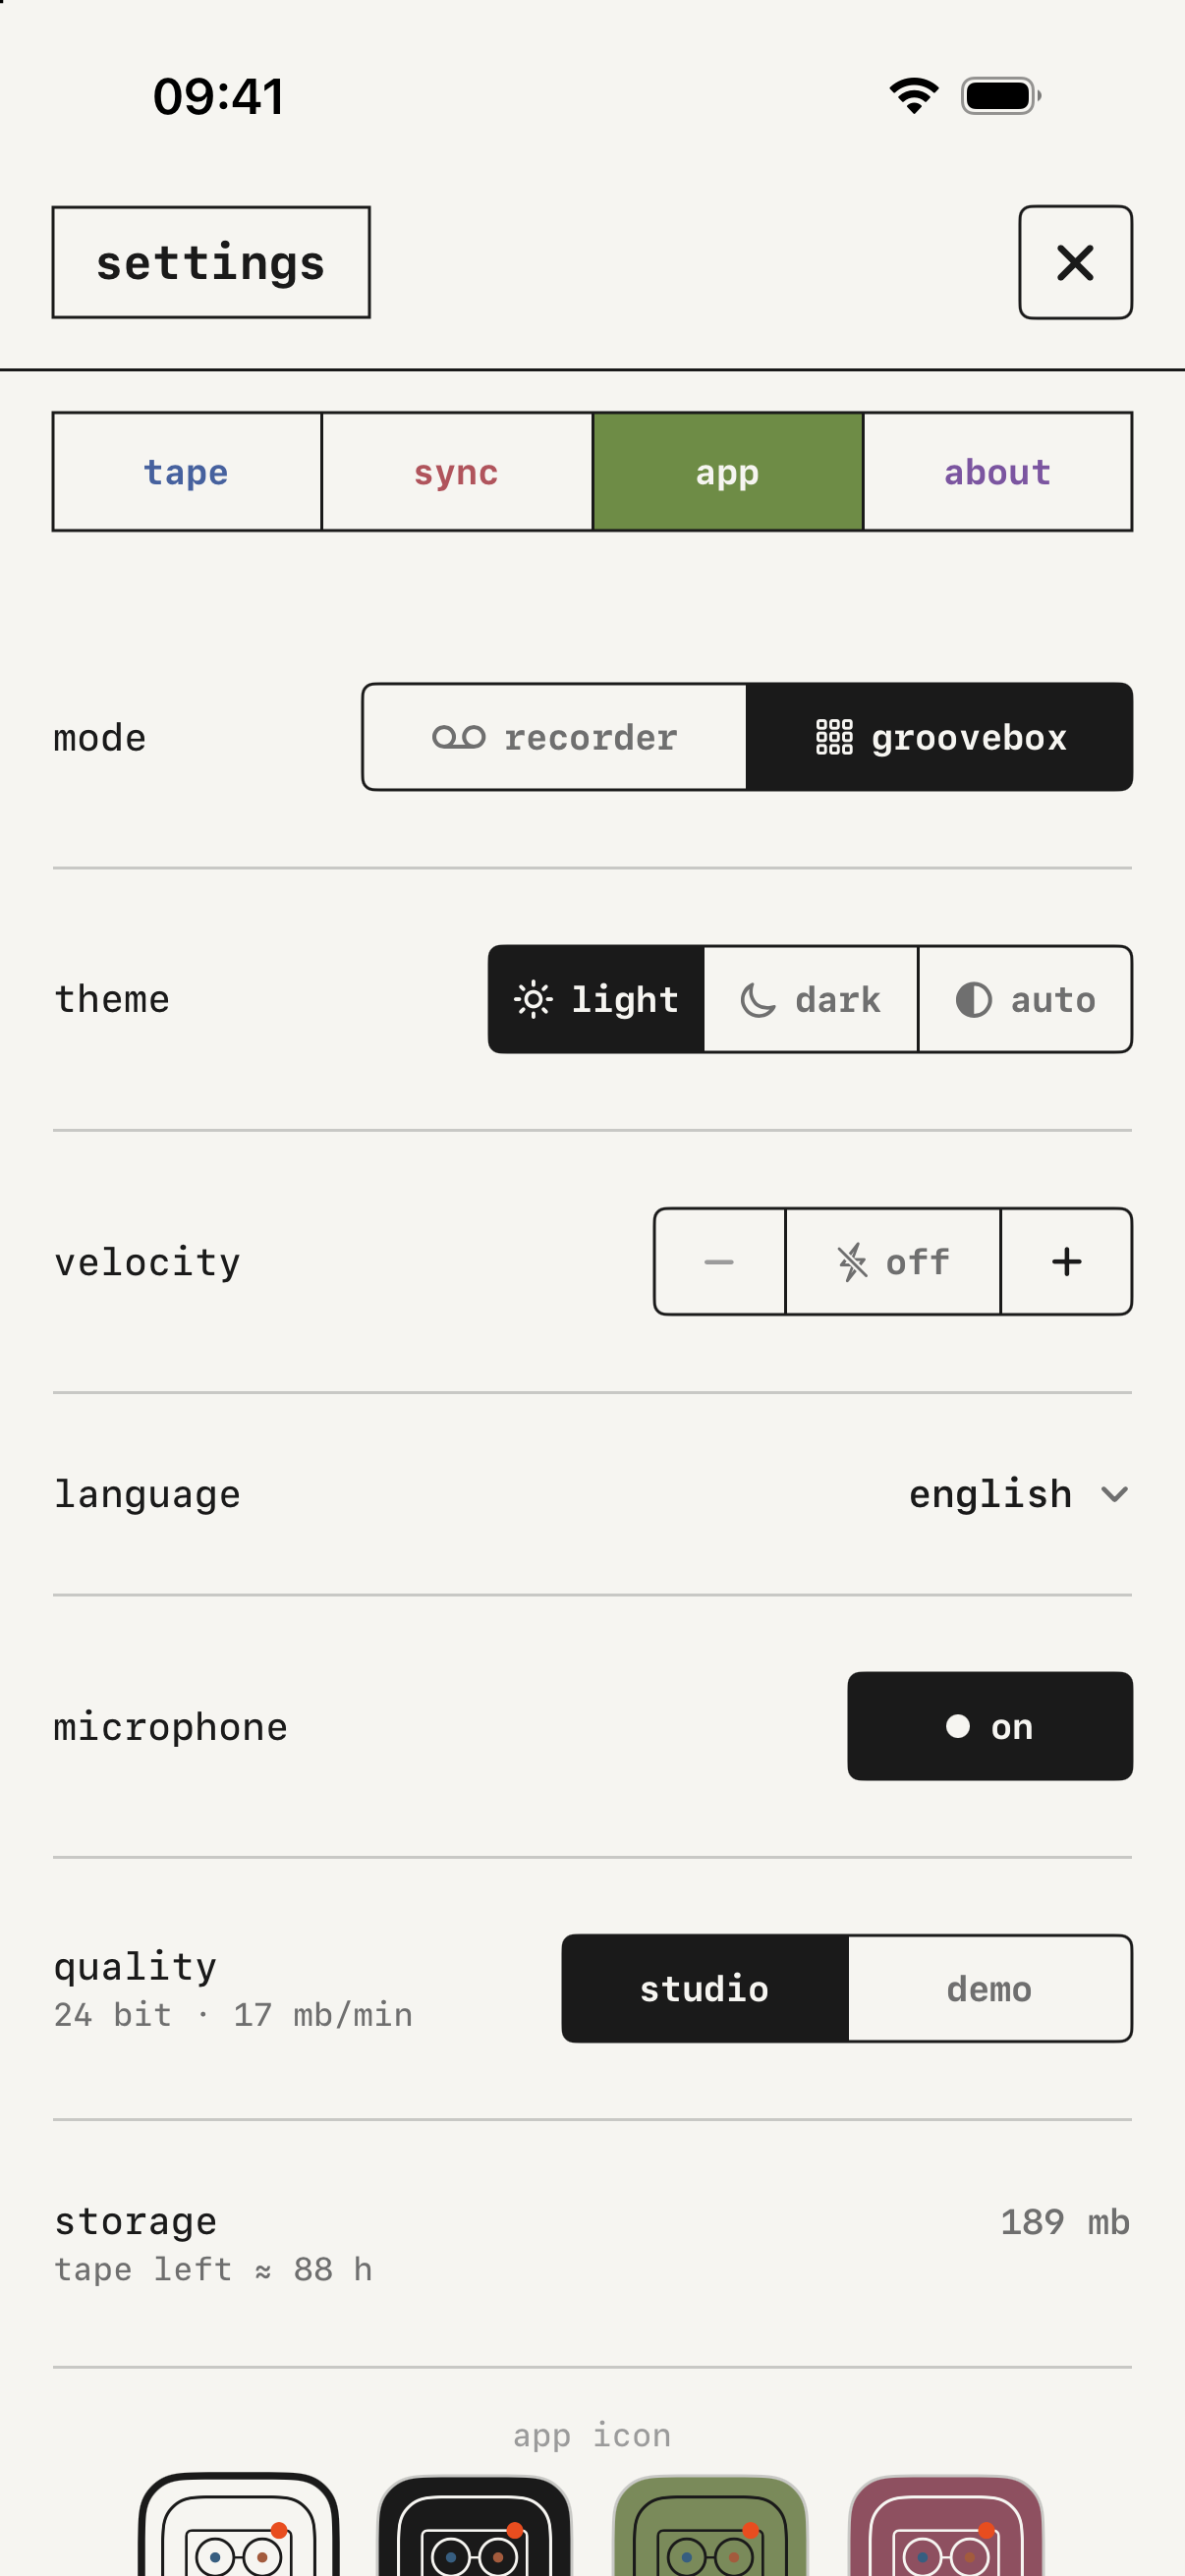
app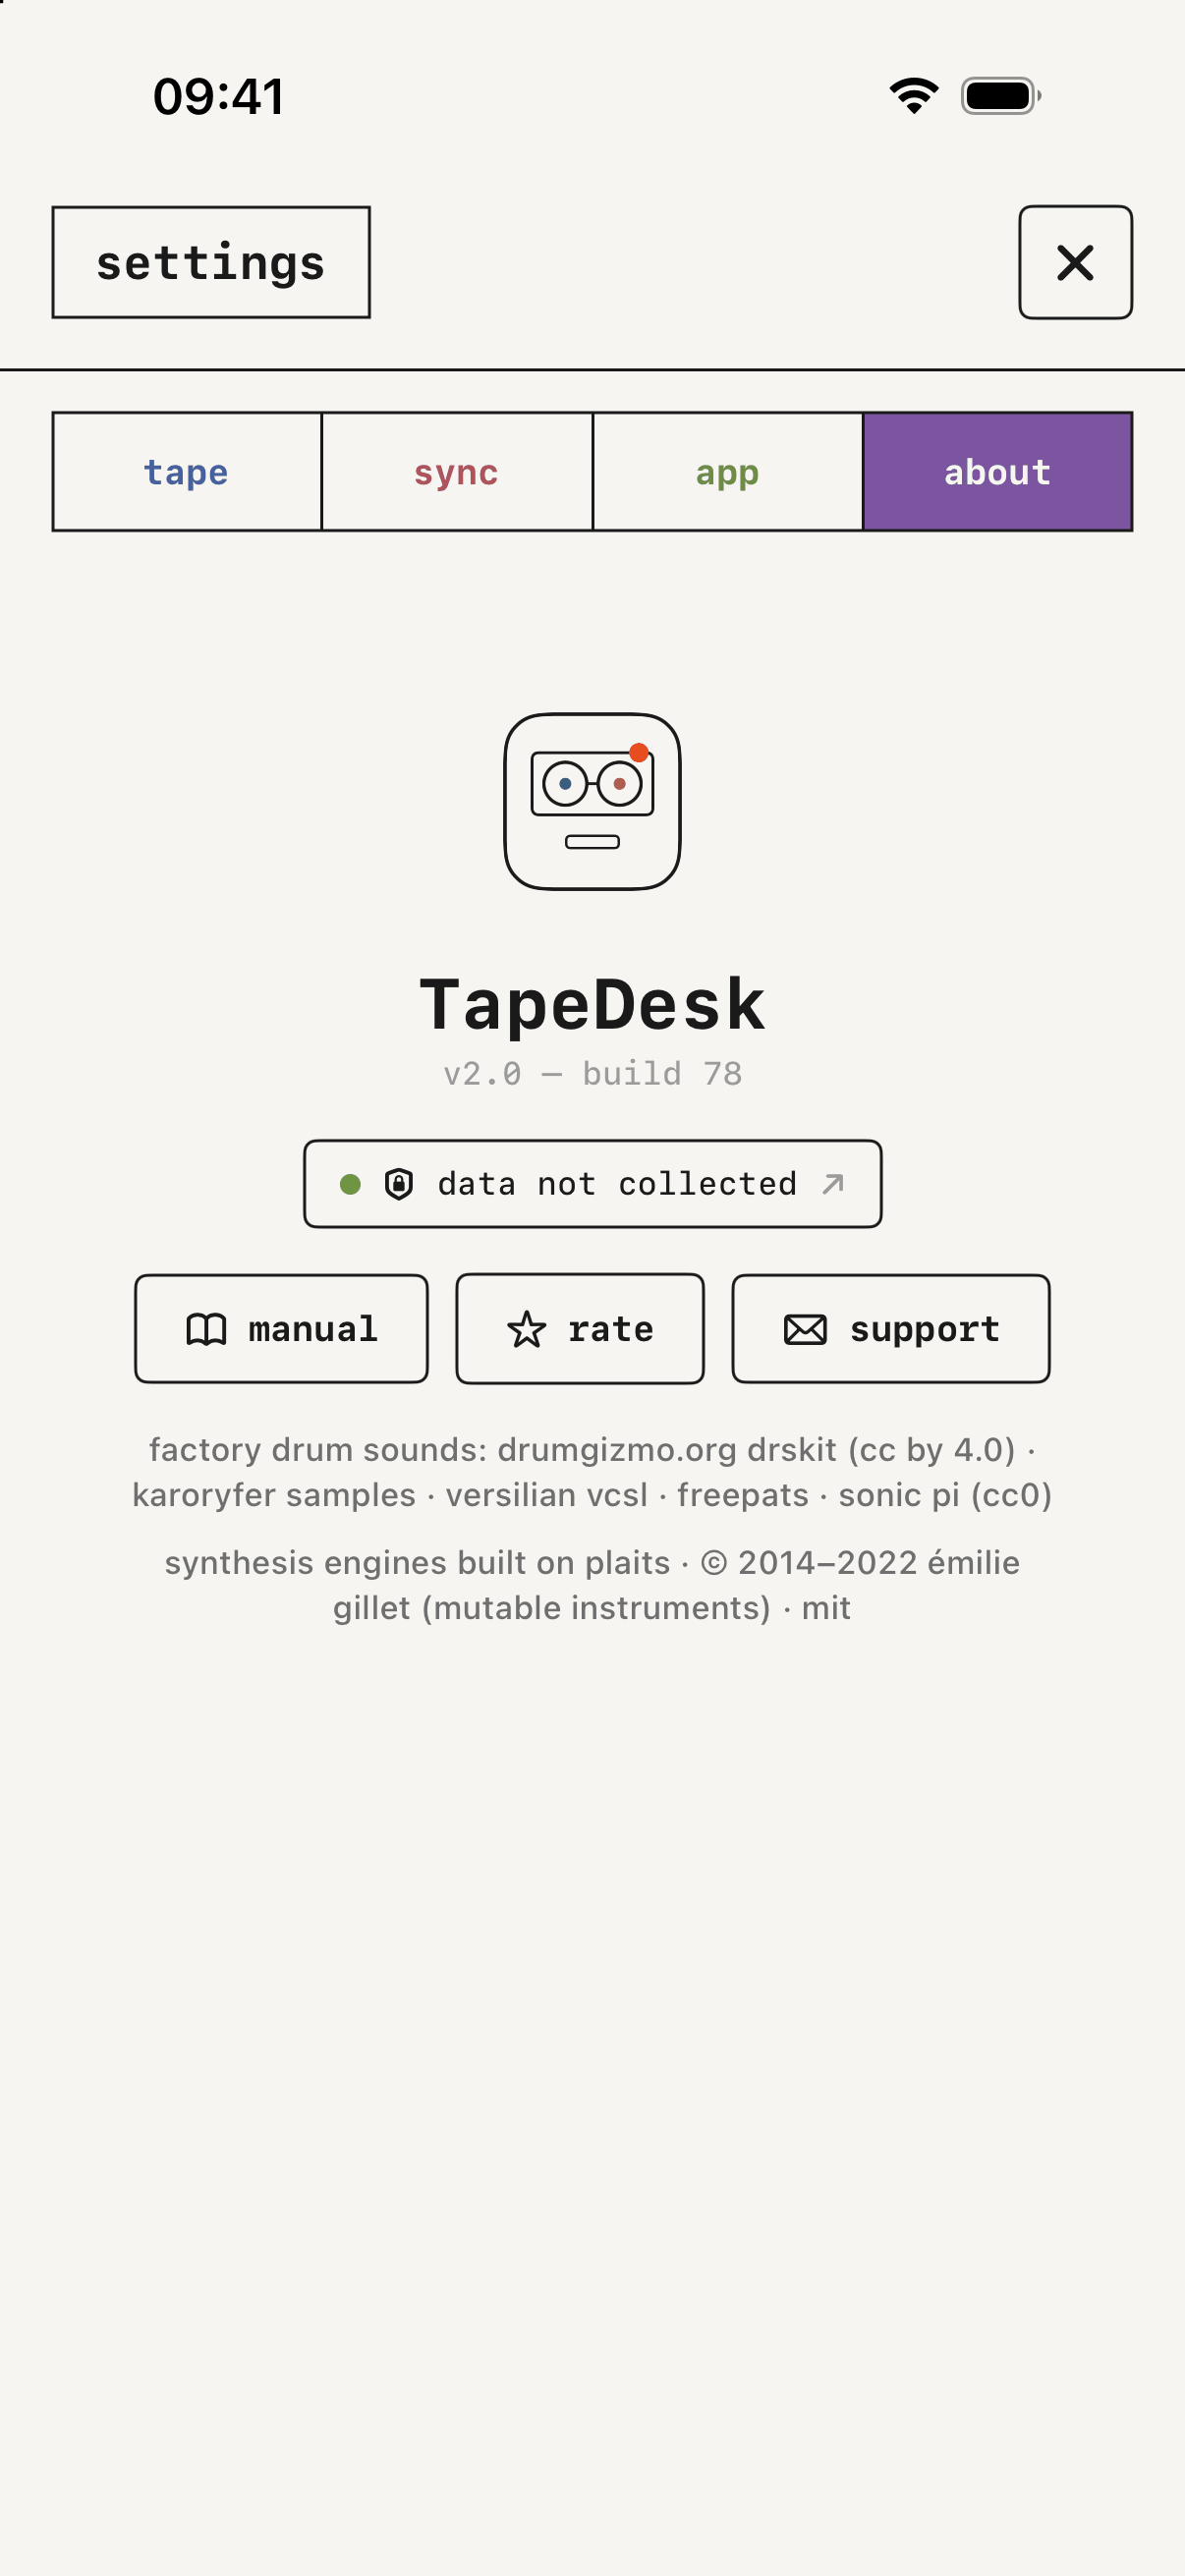
aboutIndex of terms
active· effectsarp· seqau· plugins from other apps- audio interface · recording several inputs at once, where the audio comes in
bounce· bouncing two tracks into onechange· effectschop· kitchords· chordsclock· TapeDesk as a plugincount in· arm and recorddrive· channel stripsdrop· the edit bareject· exporteq· master EQeucalyptus· eucalyptusfx 1andfx 2· effectsgroovebox· the two modesin· channel stripsjoin←and→join· the edit barkeys· keyskit· kitlearn· MIDI learnlift· the edit barlink· syncing tempoloop· loop, live loopermaster· exportmidi clock· syncing tempomix· channel stripsnorm· kitopen ui· plugins from other appsping· seqplugins· plugins from other appsprint· eucalyptusproject· your tapespunch· arm and recordrec· arm and recordrec mode· arm and recordrecorder· the two modesreturn· effectsrev· the edit barrew· moving around the tapesafe· recording several inputs at onceseq· seqsos· arm and recordsource· recording the synthsource → track· recording several inputs at oncesources· recording several inputs at once, TapeDesk as a pluginspeed· speedstart· your first takestep· seqstoptwice · arm and recordsynth· picking a soundTapeDesk: Play· TapeDesk: PlayTapeDesk: Tape· TapeDesk as a plugintapes· your tapes- threshold · let the take start itself
thru· TapeDesk as a plugin- track sound · each track's sound
tracks· tracks, exportundo· tracksundoandredo· the edit bar- USB audio interface · recording several inputs at once
Licenses
The factory sounds in kit come from DrumGizmo.org DRSKit (CC BY 4.0), Karoryfer Samples, Versilian VCSL, FreePats and Sonic Pi (CC0).
The eleven synthesis engines are built on Plaits, by Émilie Gillet (Mutable Instruments), under the MIT license. Copyright 2014-2022 Émilie Gillet. The license asks for its text to travel with the program, so here it is.
Permission is hereby granted, free of charge, to any person obtaining a copy of this software and associated documentation files (the "Software"), to deal in the Software without restriction, including without limitation the rights to use, copy, modify, merge, publish, distribute, sublicense, and/or sell copies of the Software, and to permit persons to whom the Software is furnished to do so, subject to the following conditions:
The above copyright notice and this permission notice shall be included in all copies or substantial portions of the Software.
THE SOFTWARE IS PROVIDED "AS IS", WITHOUT WARRANTY OF ANY KIND, EXPRESS OR IMPLIED, INCLUDING BUT NOT LIMITED TO THE WARRANTIES OF MERCHANTABILITY, FITNESS FOR A PARTICULAR PURPOSE AND NONINFRINGEMENT. IN NO EVENT SHALL THE AUTHORS OR COPYRIGHT HOLDERS BE LIABLE FOR ANY CLAIM, DAMAGES OR OTHER LIABILITY, WHETHER IN AN ACTION OF CONTRACT, TORT OR OTHERWISE, ARISING FROM, OUT OF OR IN CONNECTION WITH THE SOFTWARE OR THE USE OR OTHER DEALINGS IN THE SOFTWARE.